Most ML projects do not fail because of model choice. They fail in the messy middle: finding the right dataset, checking usability, writing training code, fixing errors, reading logs, debugging weak results, evaluating outputs, and packaging the model for others.
This is where ML Intern fits. It is not just AutoML for model selection and tuning. It supports the wider ML engineering workflow: research, dataset inspection, coding, job execution, debugging, and Hugging Face preparation. In this article, we test whether ML Intern can turn an idea into a working ML artifact faster and whether it deserves a place in your AI stack or not.
What ML Intern is
ML Intern is an open-source assistant for machine learning work, built around the Hugging Face ecosystem. It can use docs, papers, datasets, repos, jobs, and cloud compute to move an ML task forward.

Unlike traditional AutoML, it does not only focus on model selection and training. It also helps with the messy parts around training: researching approaches, inspecting data, writing scripts, fixing errors, and preparing outputs for sharing.
Think of AutoML as a model-building machine. ML Intern is closer to a junior ML teammate. It can help read, plan, code, run, and report, but it still needs supervision.
The Project Goal
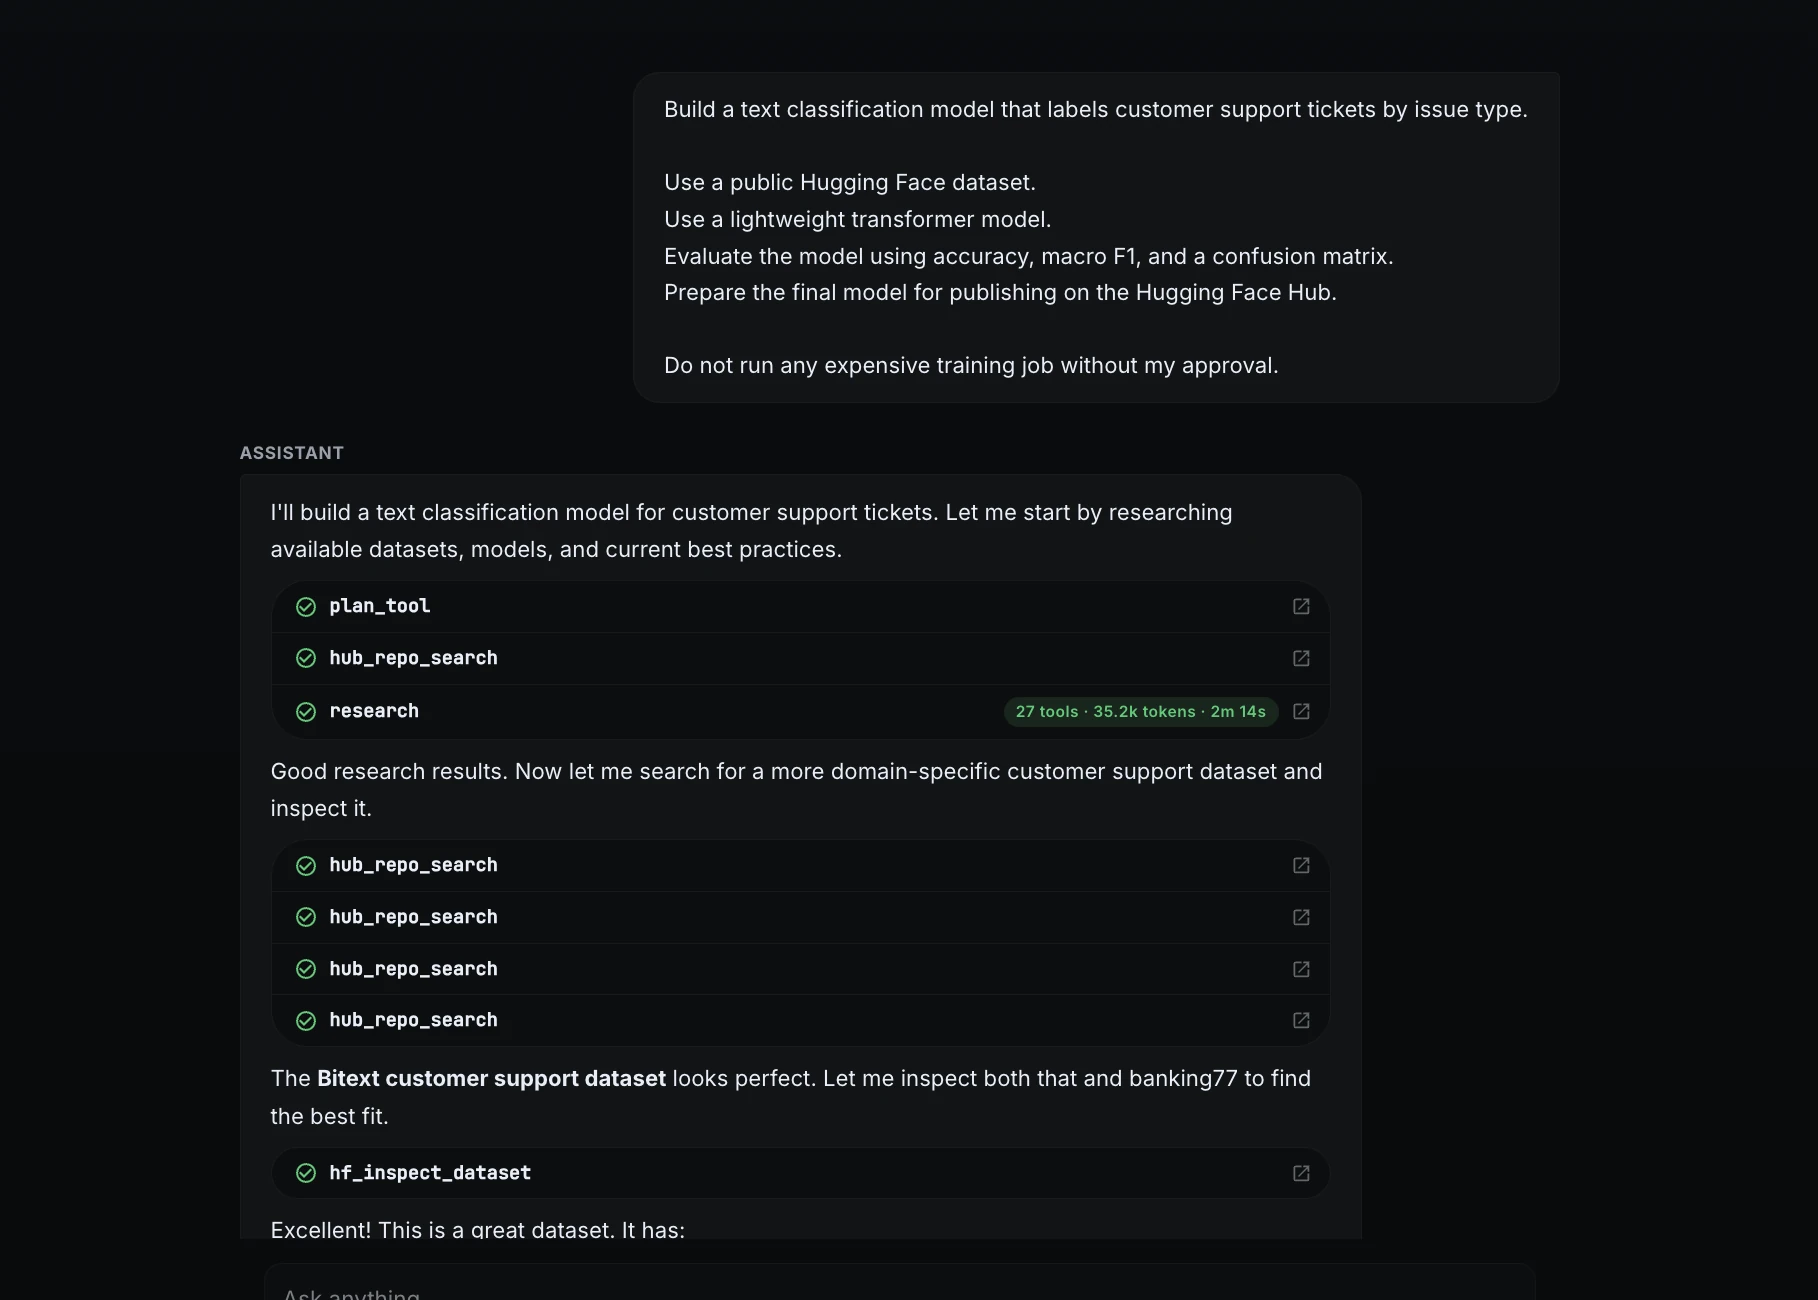
For this walkthrough, I gave ML Intern one practical machine learning task: build a text classification model that labels customer support tickets by issue type.
The model needed to use a public Hugging Face dataset, fine-tune a lightweight transformer, evaluate results with accuracy, macro F1, and a confusion matrix, and prepare the final model for publishing on the Hugging Face Hub.
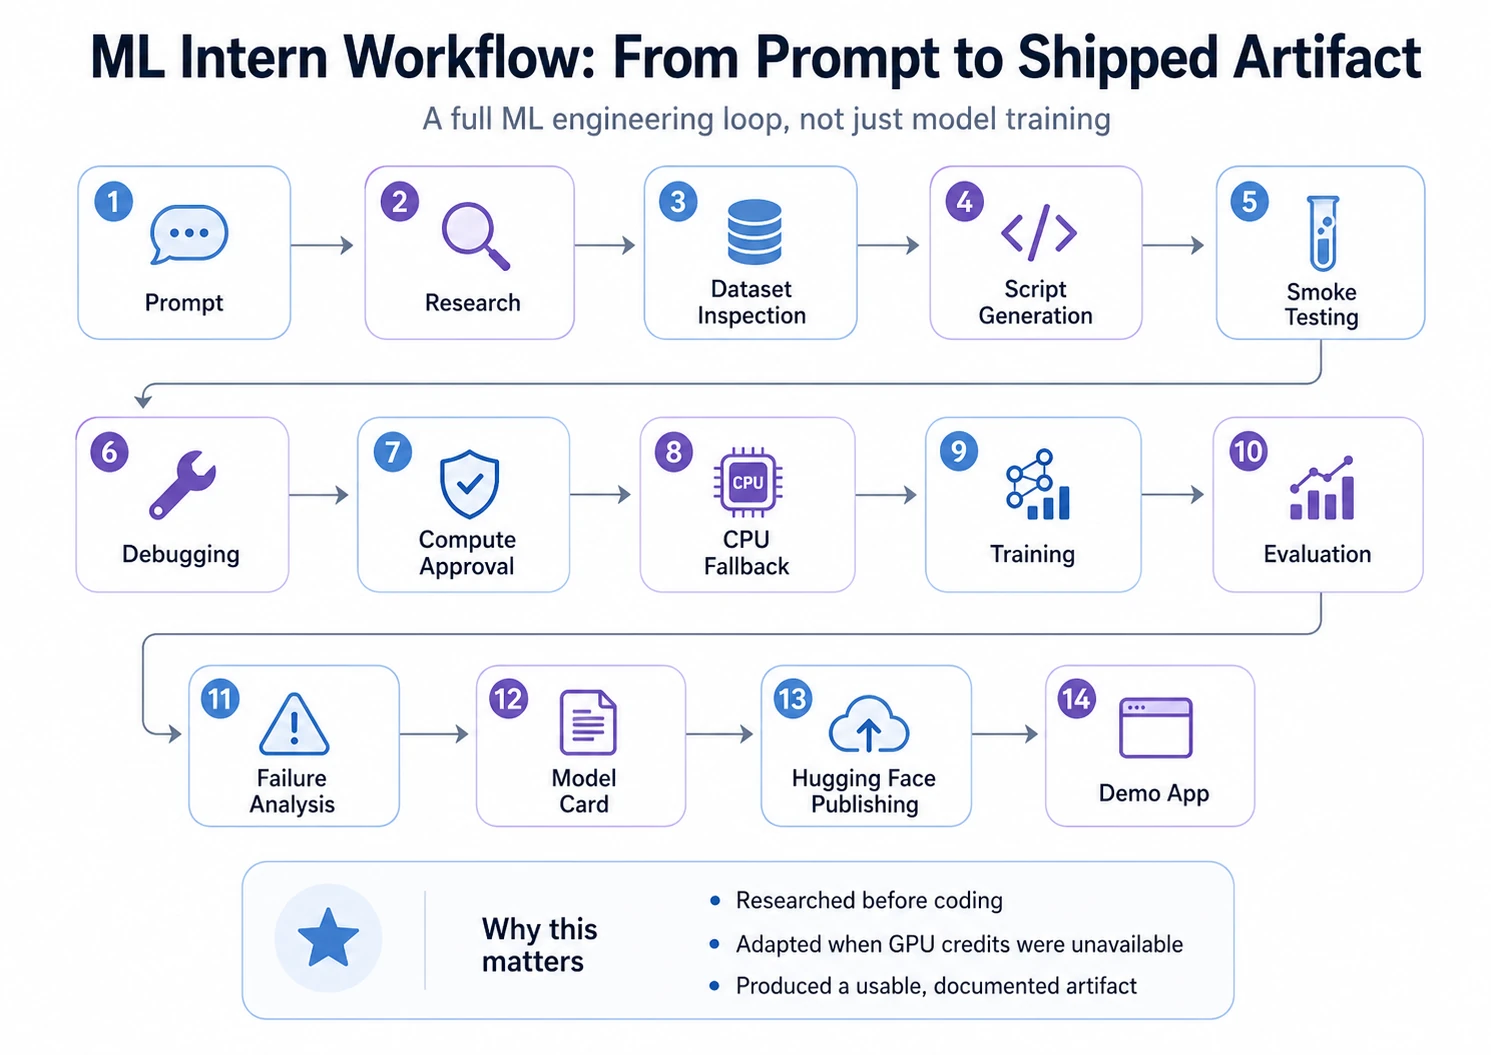
To test ML Intern properly, I used one complete project instead of showing isolated features. The goal was not just to see whether it could generate code, but whether it could move through the full ML workflow: research, dataset inspection, script generation, debugging, training, evaluation, publishing, and demo creation.
This made the experiment closer to a real ML project, where success depends on more than choosing a model.
Now, let’s see step-by-step walkthrough:
Step 1: Started with a clear project prompt
I began by giving ML Intern a specific task instead of a vague request.
Build a text classification model that labels customer support tickets by issue type.

1. Use a public Hugging Face dataset.
2. Use a lightweight transformer model.
3. Evaluate the model using accuracy, macro F1, and a confusion matrix.
4. Prepare the final model for publishing on the Hugging Face Hub.

Do not run any expensive training job without my approval.
This prompt defined the goal, model type, evaluation method, final deliverable, and compute safety rule.
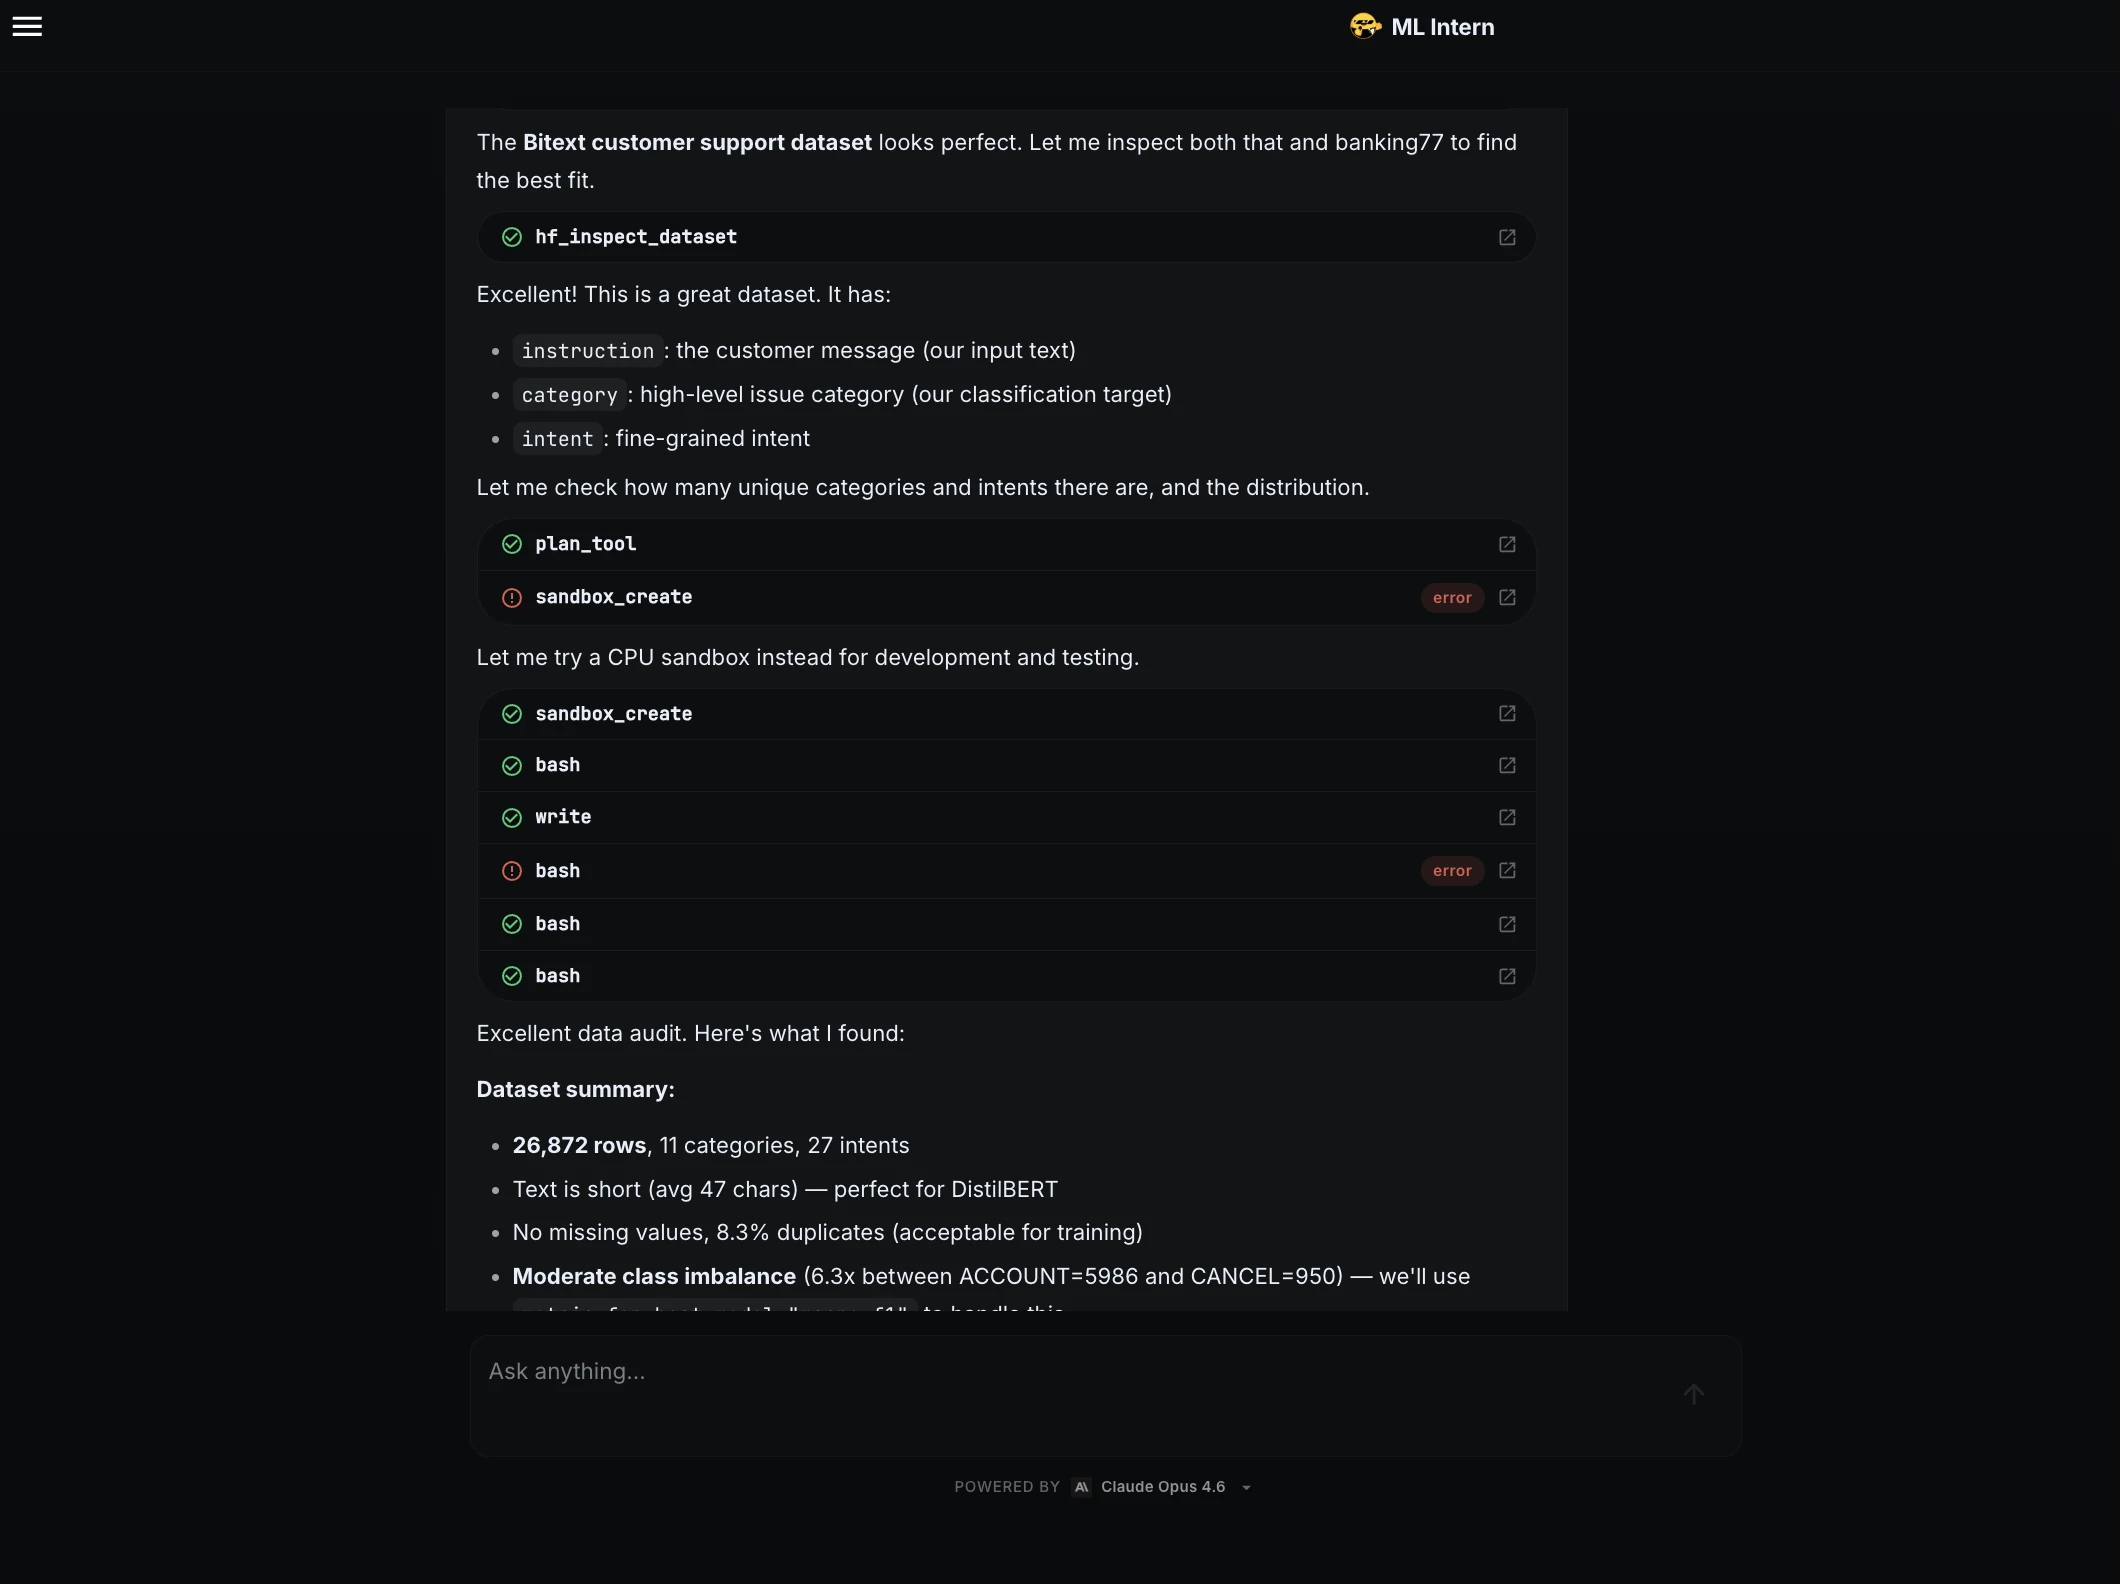
Step 2: Dataset research and selection
ML Intern searched for suitable public datasets and selected the Bitext customer support dataset. It identified the useful fields: instruction as the input text, category as the classification label, and intent as a fine-grained intent.
It then summarized the dataset:
Step 3: Smoke testing and debugging
Before training the full model, ML Intern wrote a training script and tested it on a small sample.
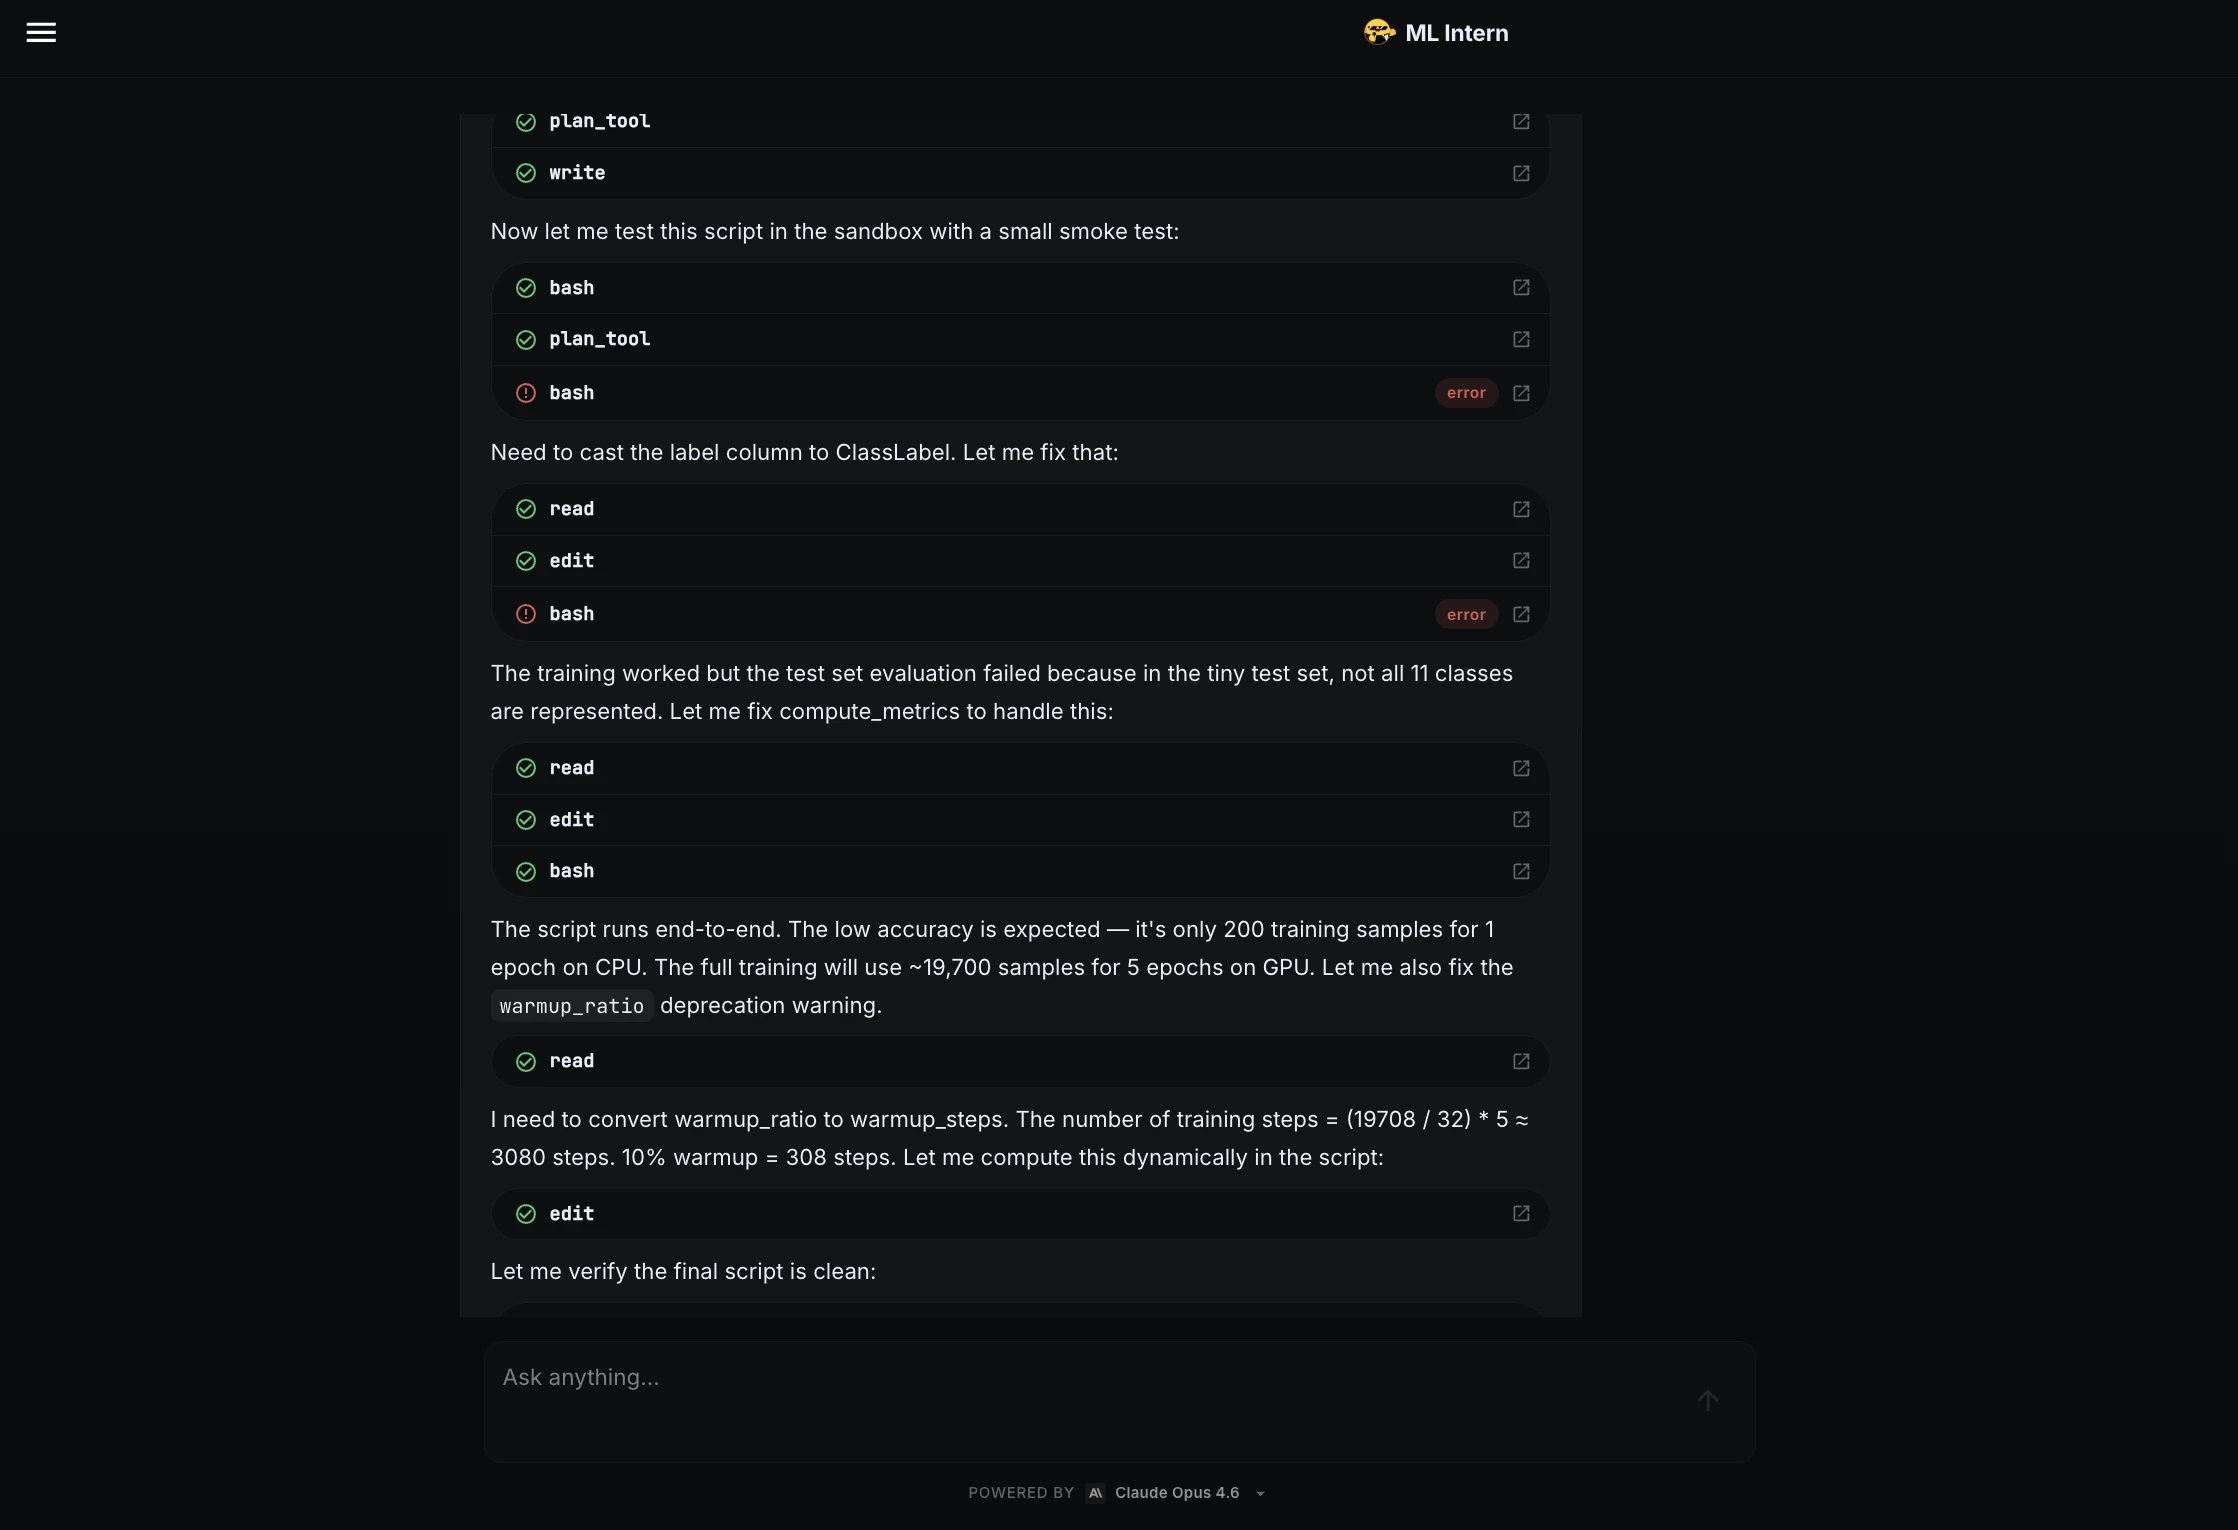
The smoke test found issues! The label column needed to be converted to ClassLabel, and the metric function needed to handle cases where the tiny test set did not contain all 11 classes.
ML Intern fixed both issues and confirmed that the script ran to end.
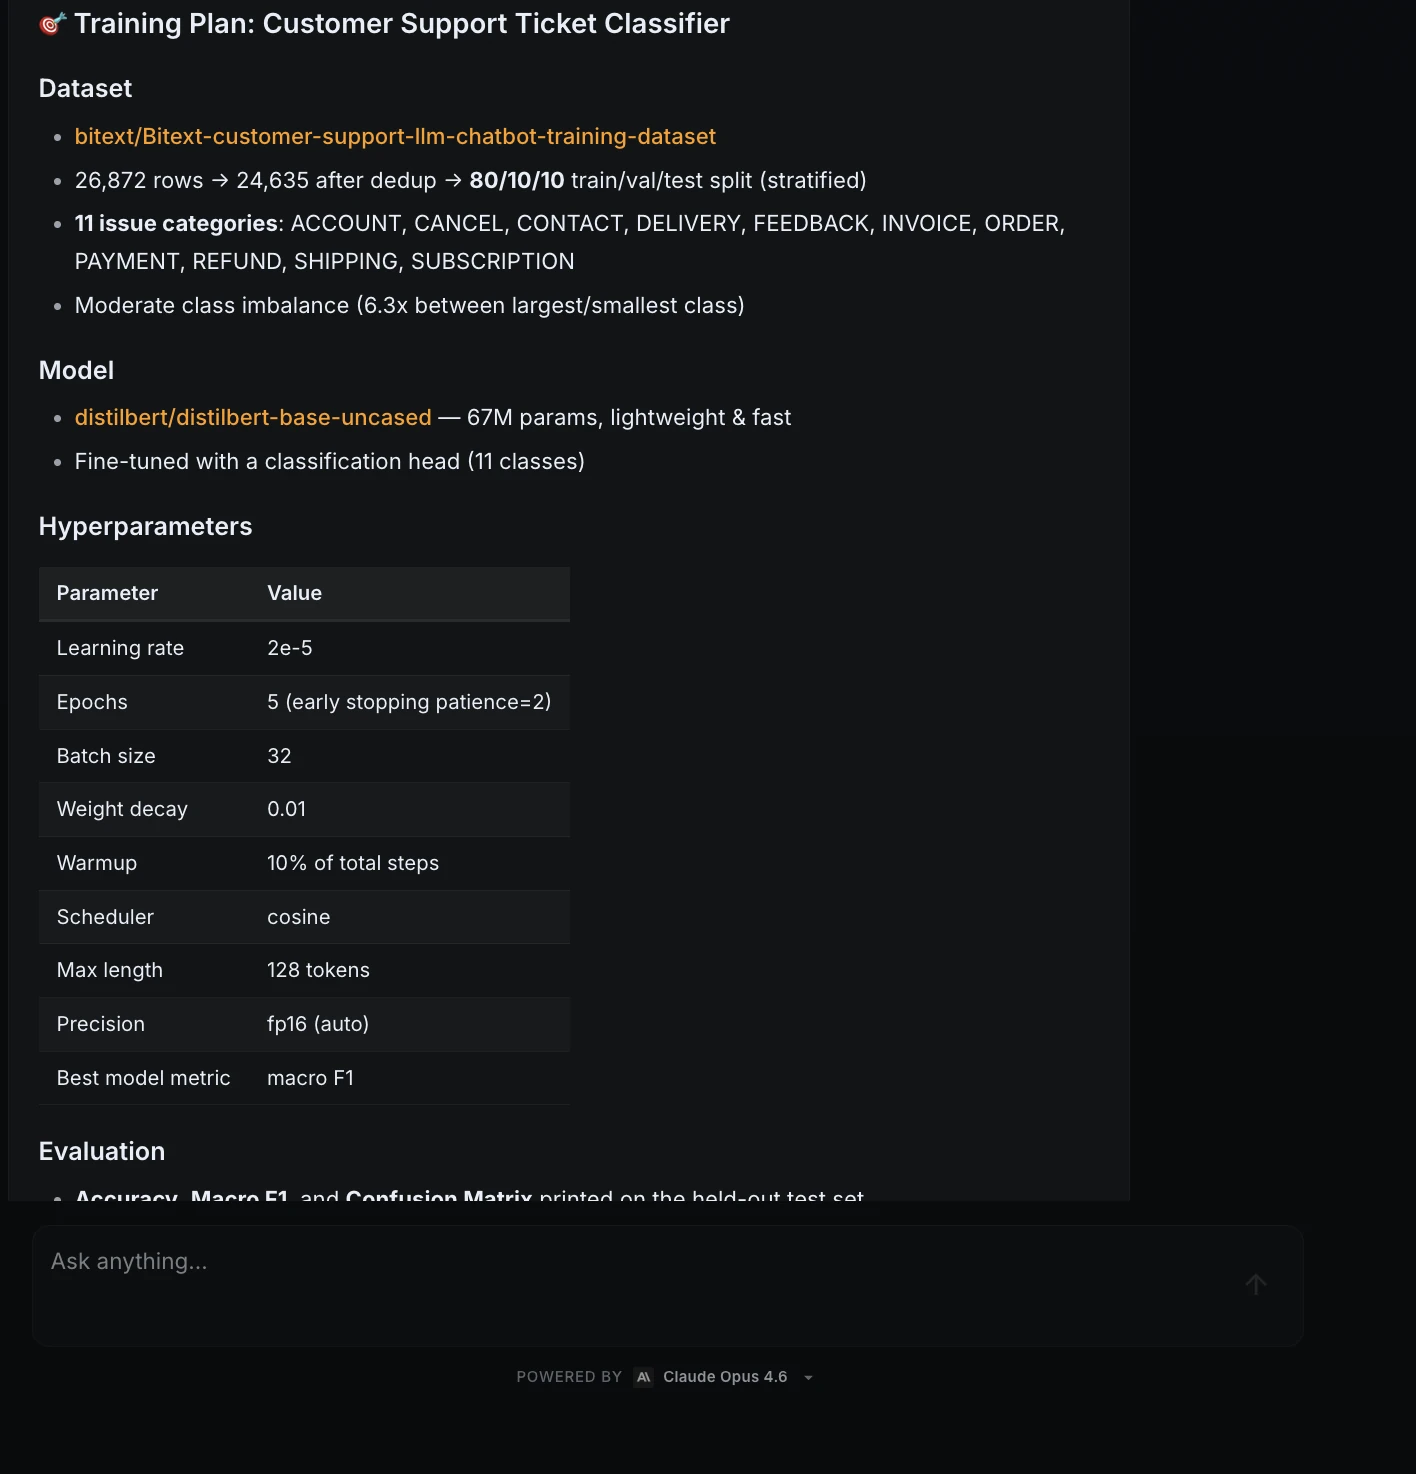
Step 4: Training plan and approval
After the script passed the smoke test, ML Intern created a training plan.
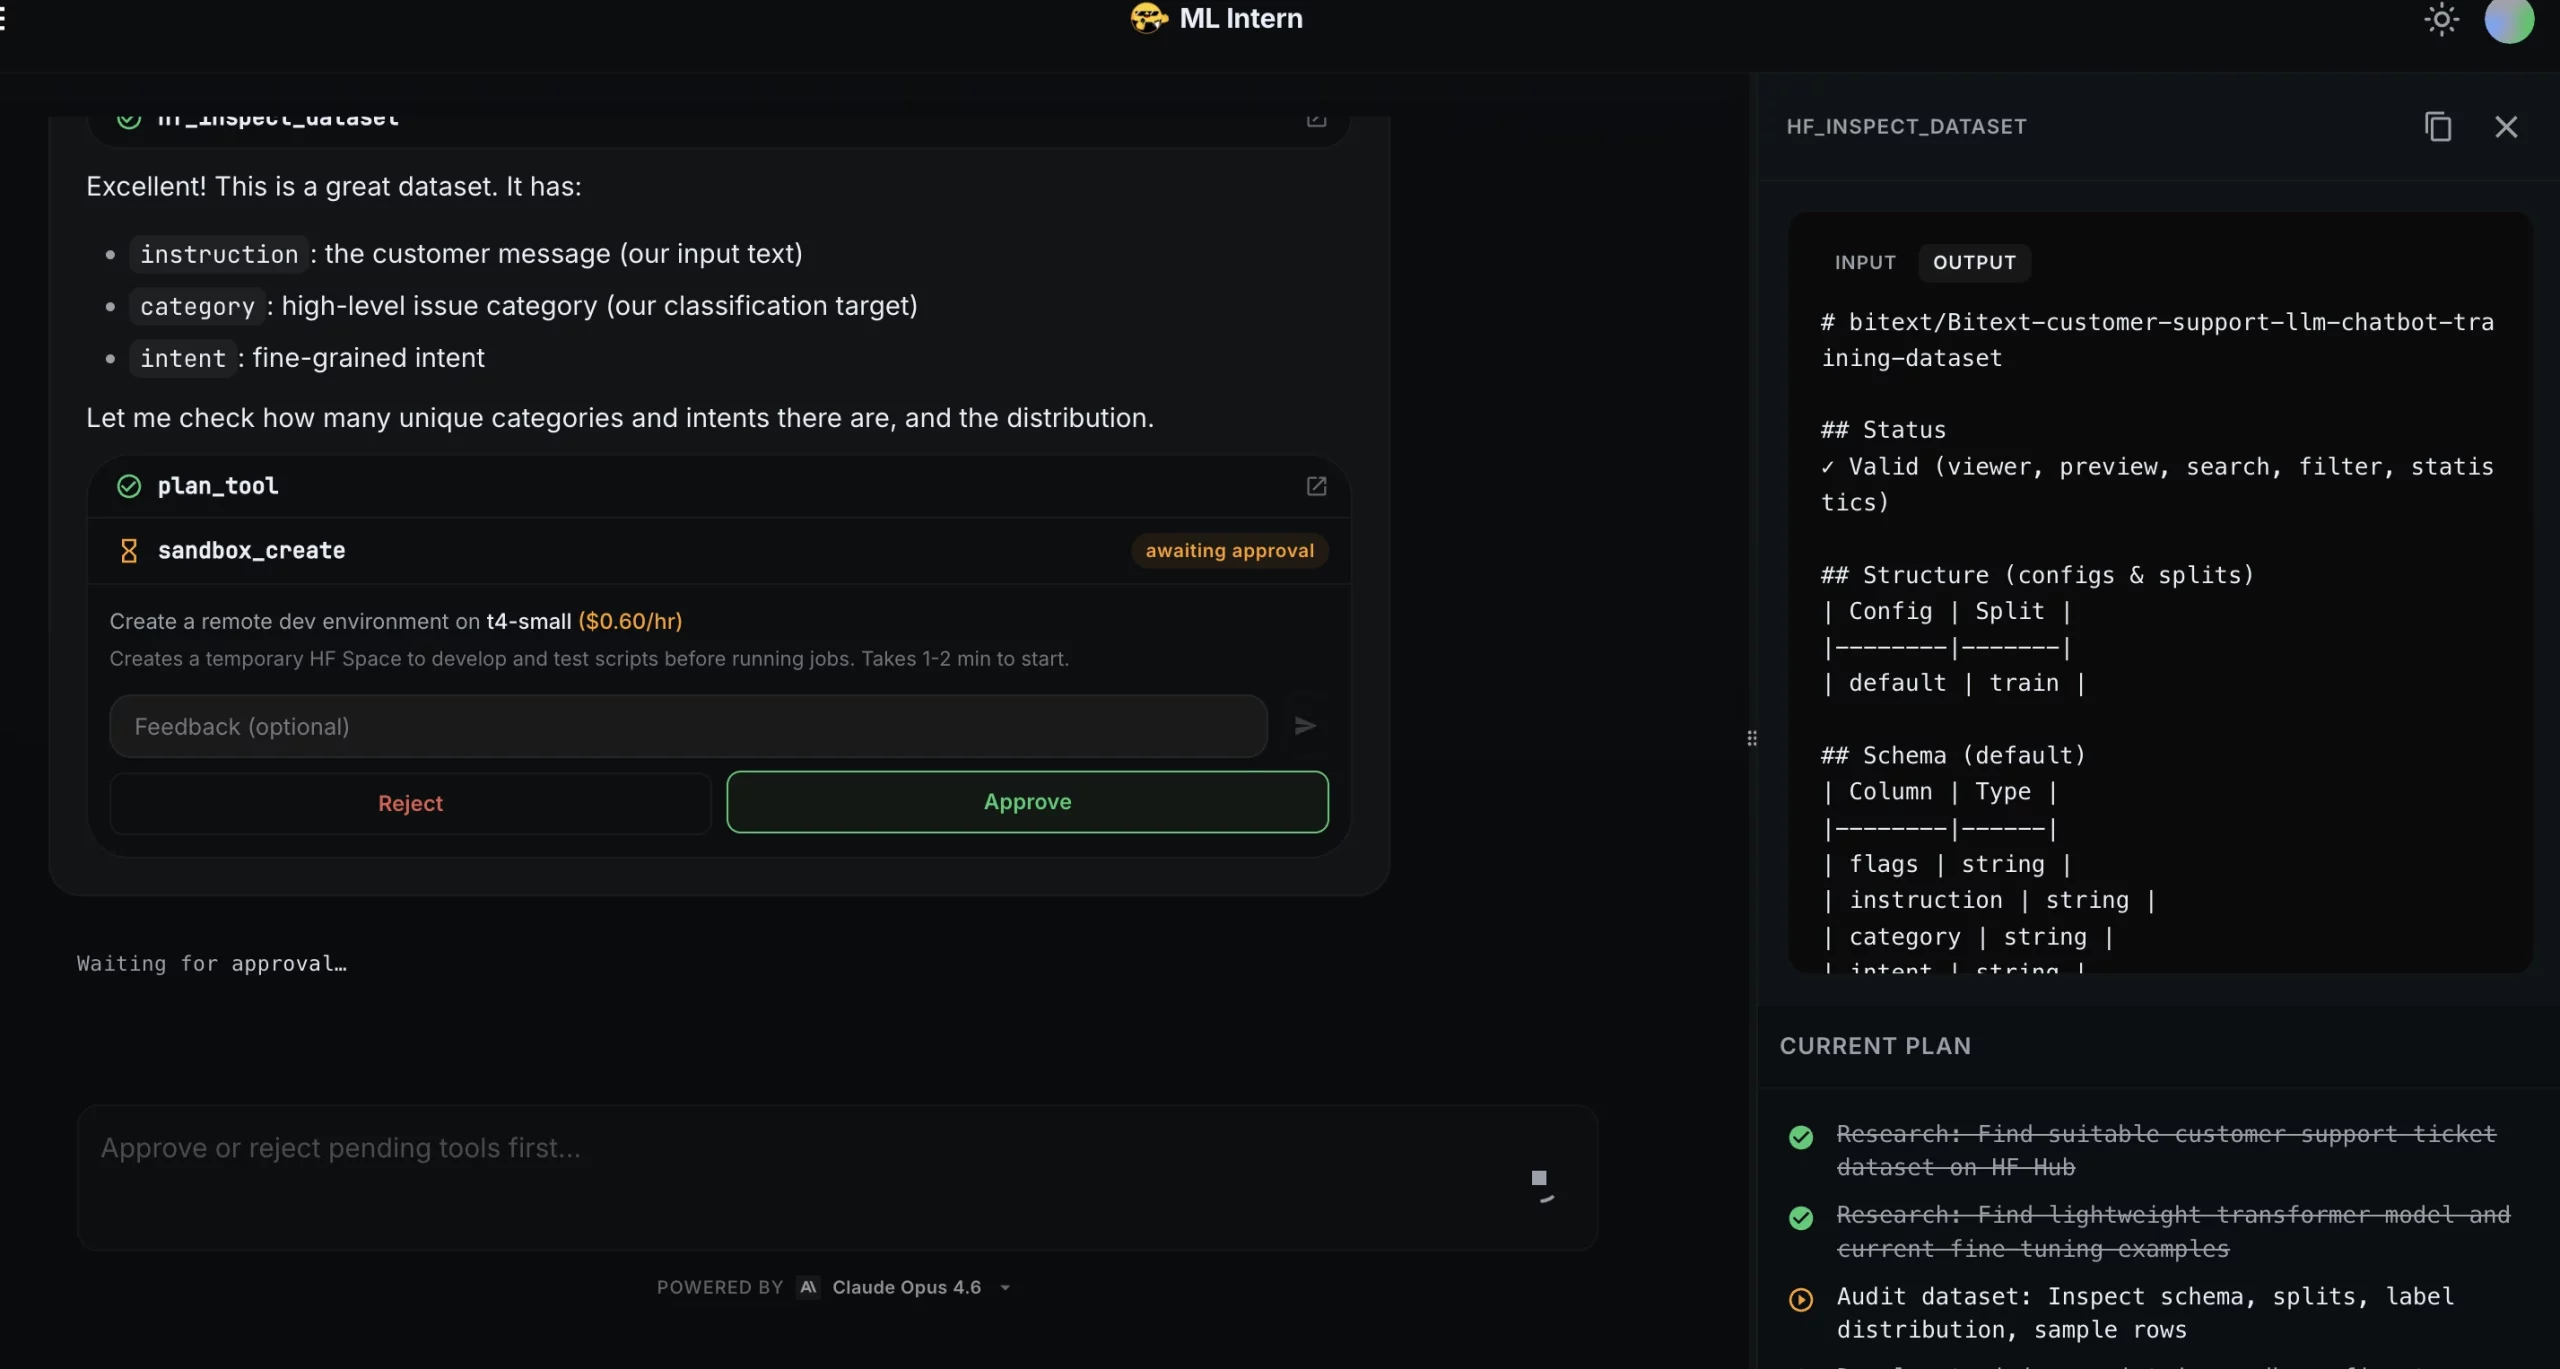
This was the approval checkpoint. ML Intern did not launch the training job automatically.
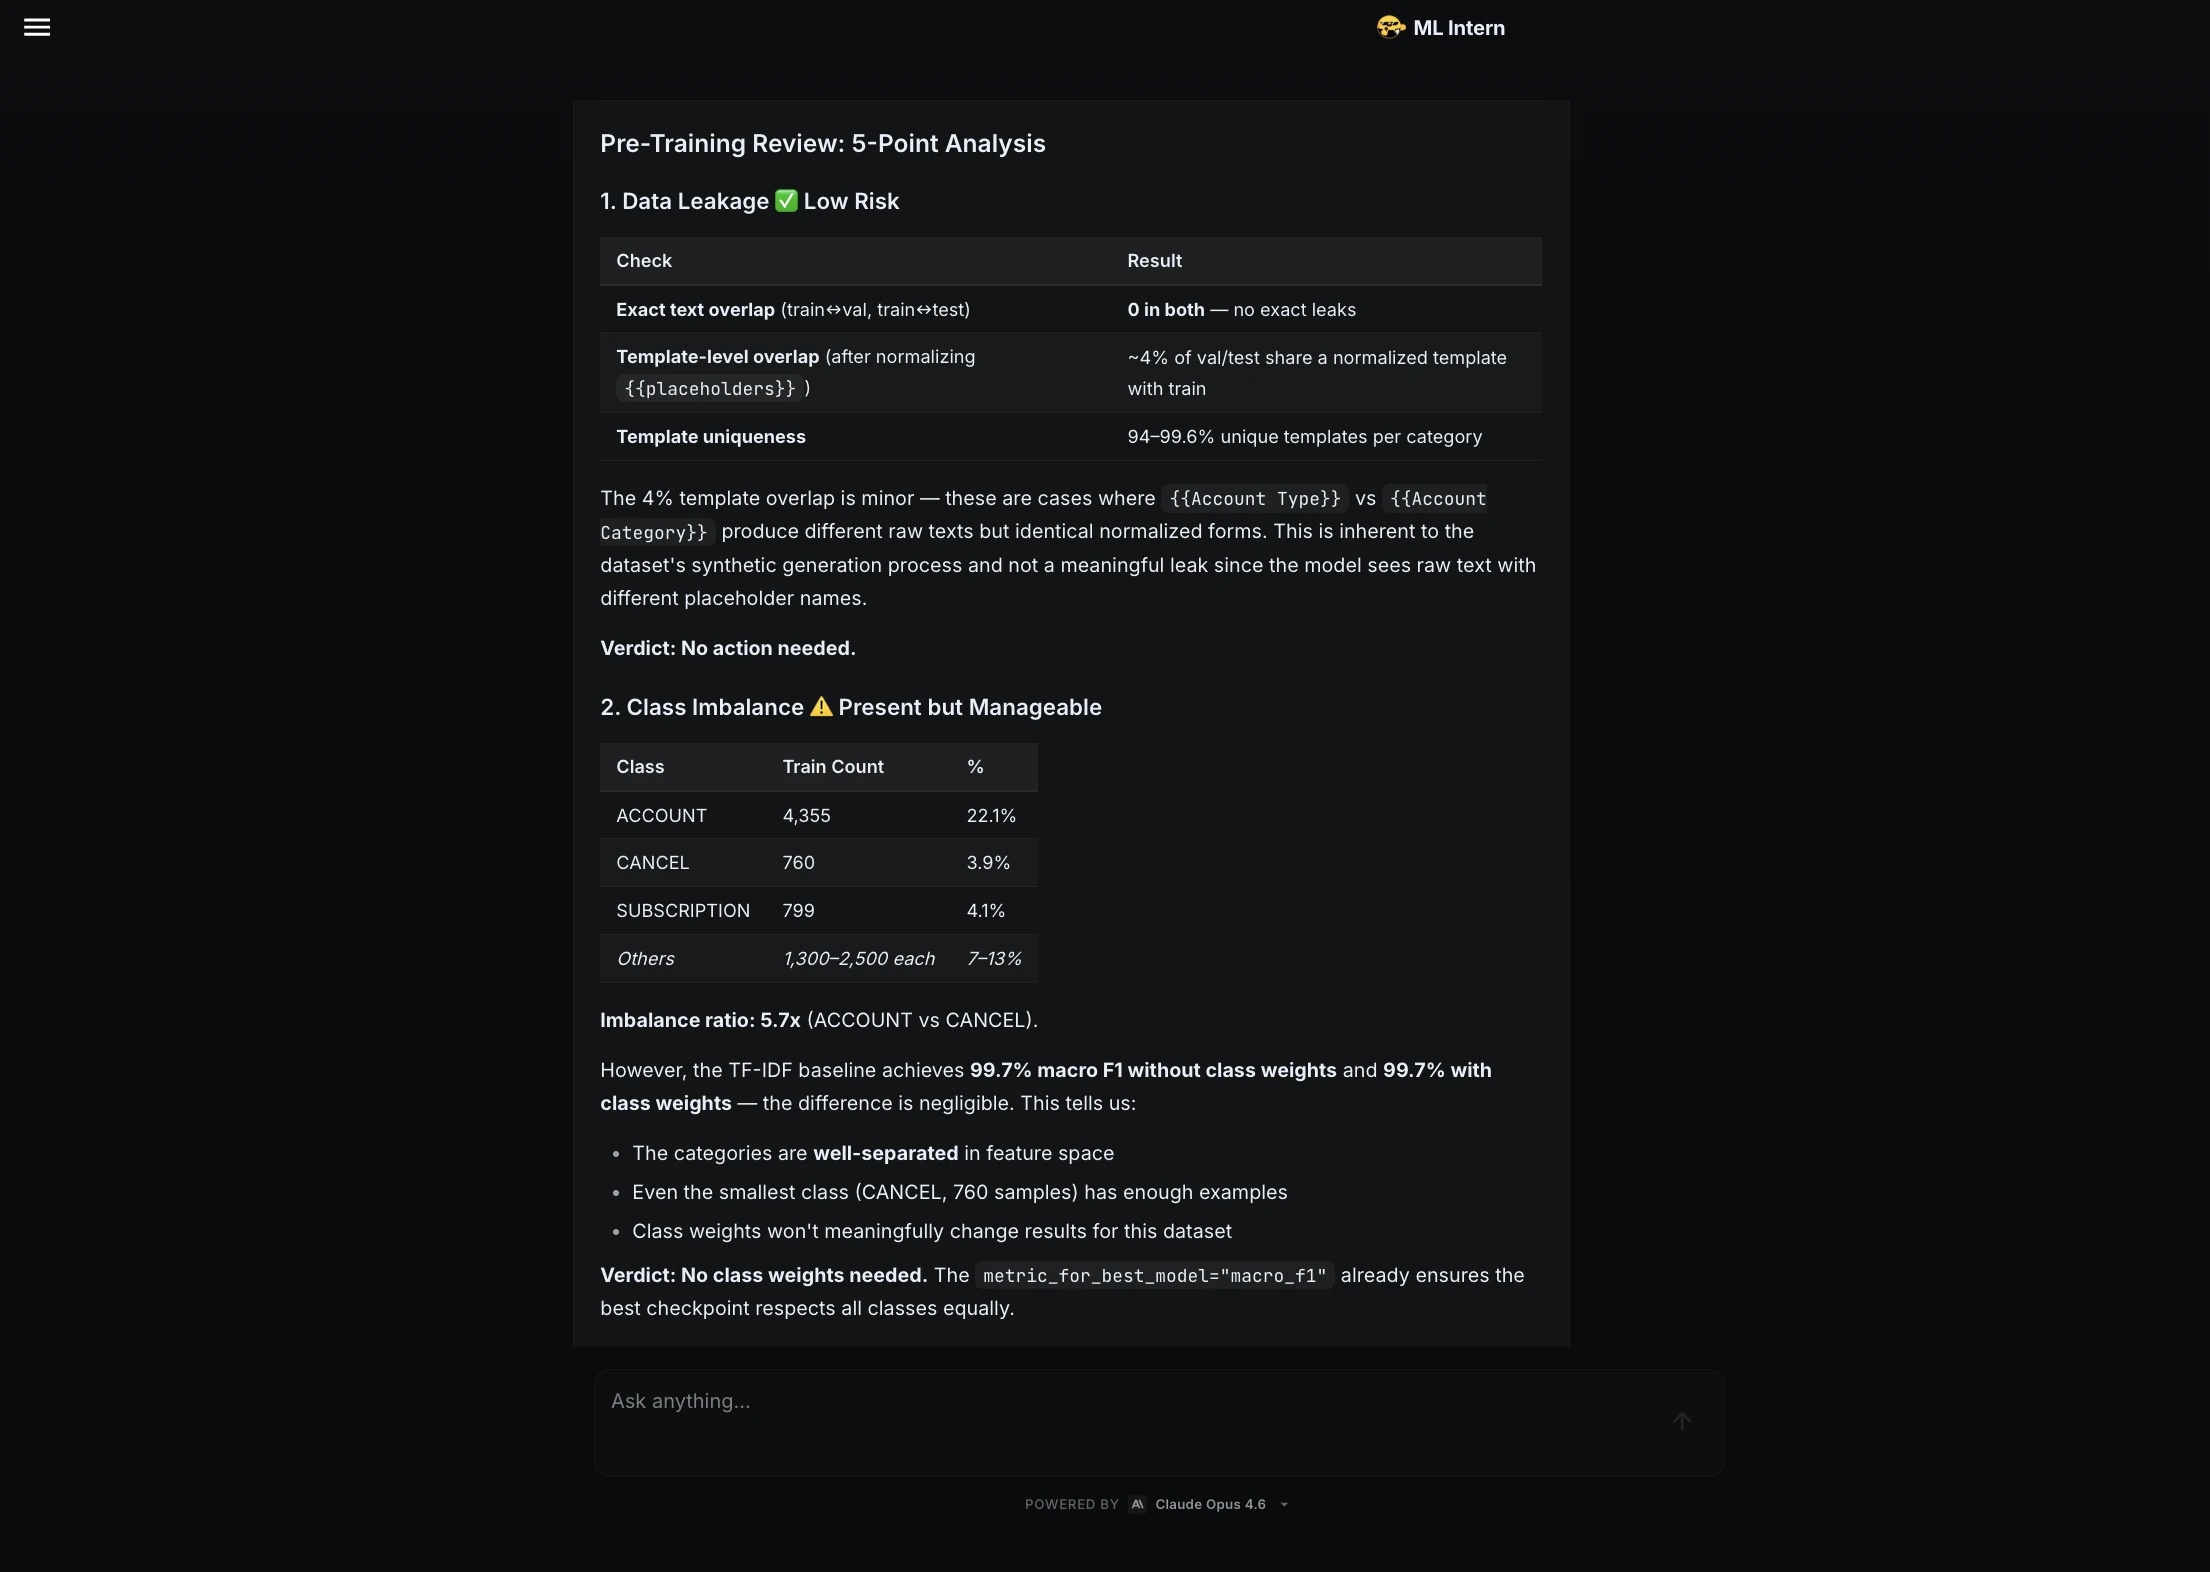
Step 5: Pre-training review
Before approving training, I asked ML Intern to do a final review.
Before proceeding, do a final pre-training review.

Check:
1. any risk of data leakage
2. whether class imbalance needs handling
3. whether hyperparameters are reasonable
4. expected baseline performance vs fine-tuned performance
5. any potential failure cases

Then confirm if the setup is ready for training.
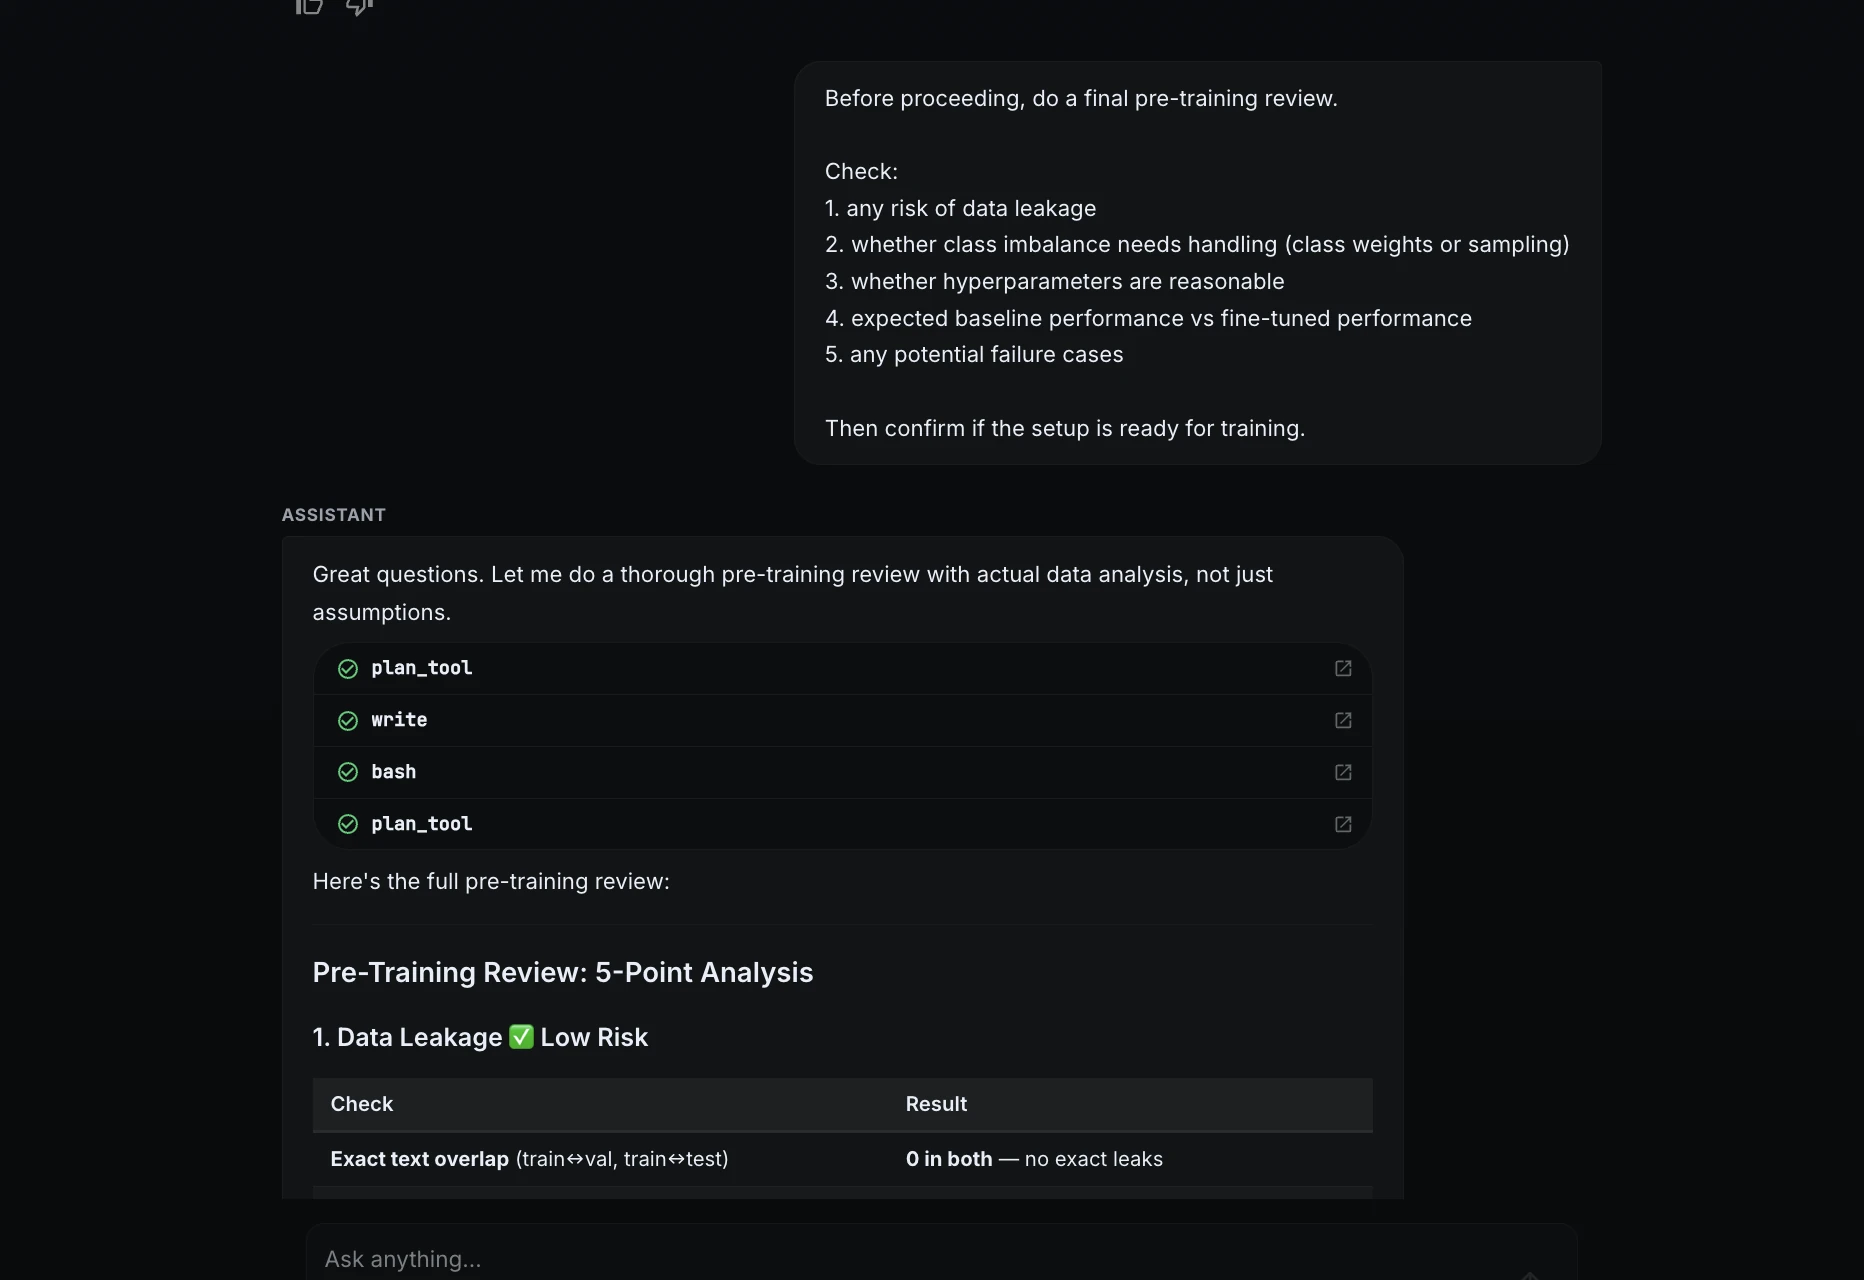
ML Intern checked leakage, class imbalance, hyperparameters, baseline performance, and possible failure cases. It concluded that the setup was ready for training.
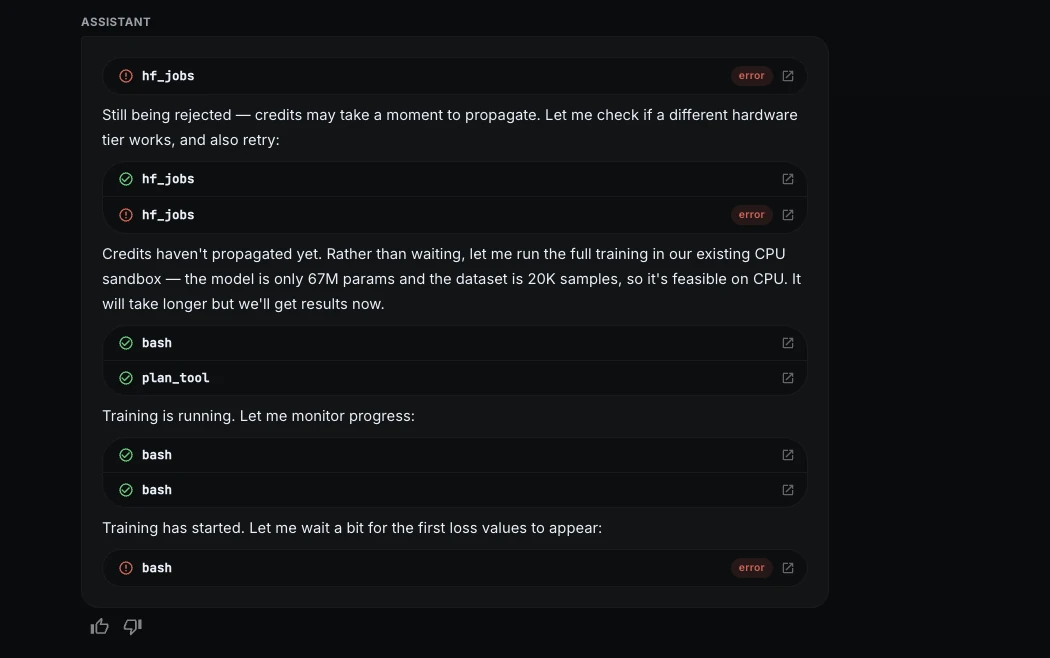
Step 6: Compute control and CPU fallback
ML Intern tried to launch the training job on Hugging Face GPU hardware, but the job was rejected because the namespace did not have available credits.
Instead of stopping, ML Intern switched to a free CPU sandbox. This was slower, but it allowed the project to continue without paid compute.
I then used a stricter training prompt:
Proceed with the training job using the approved plan, but keep compute cost low.

While running:
1. log training loss and validation metrics
2. monitor for overfitting
3. save the best checkpoint
4. use early stopping if validation macro F1 stops improving
5. stop the job immediately if errors or abnormal loss appear
6. keep the run within the estimated budget

ML Intern optimized the CPU run and continued safely.
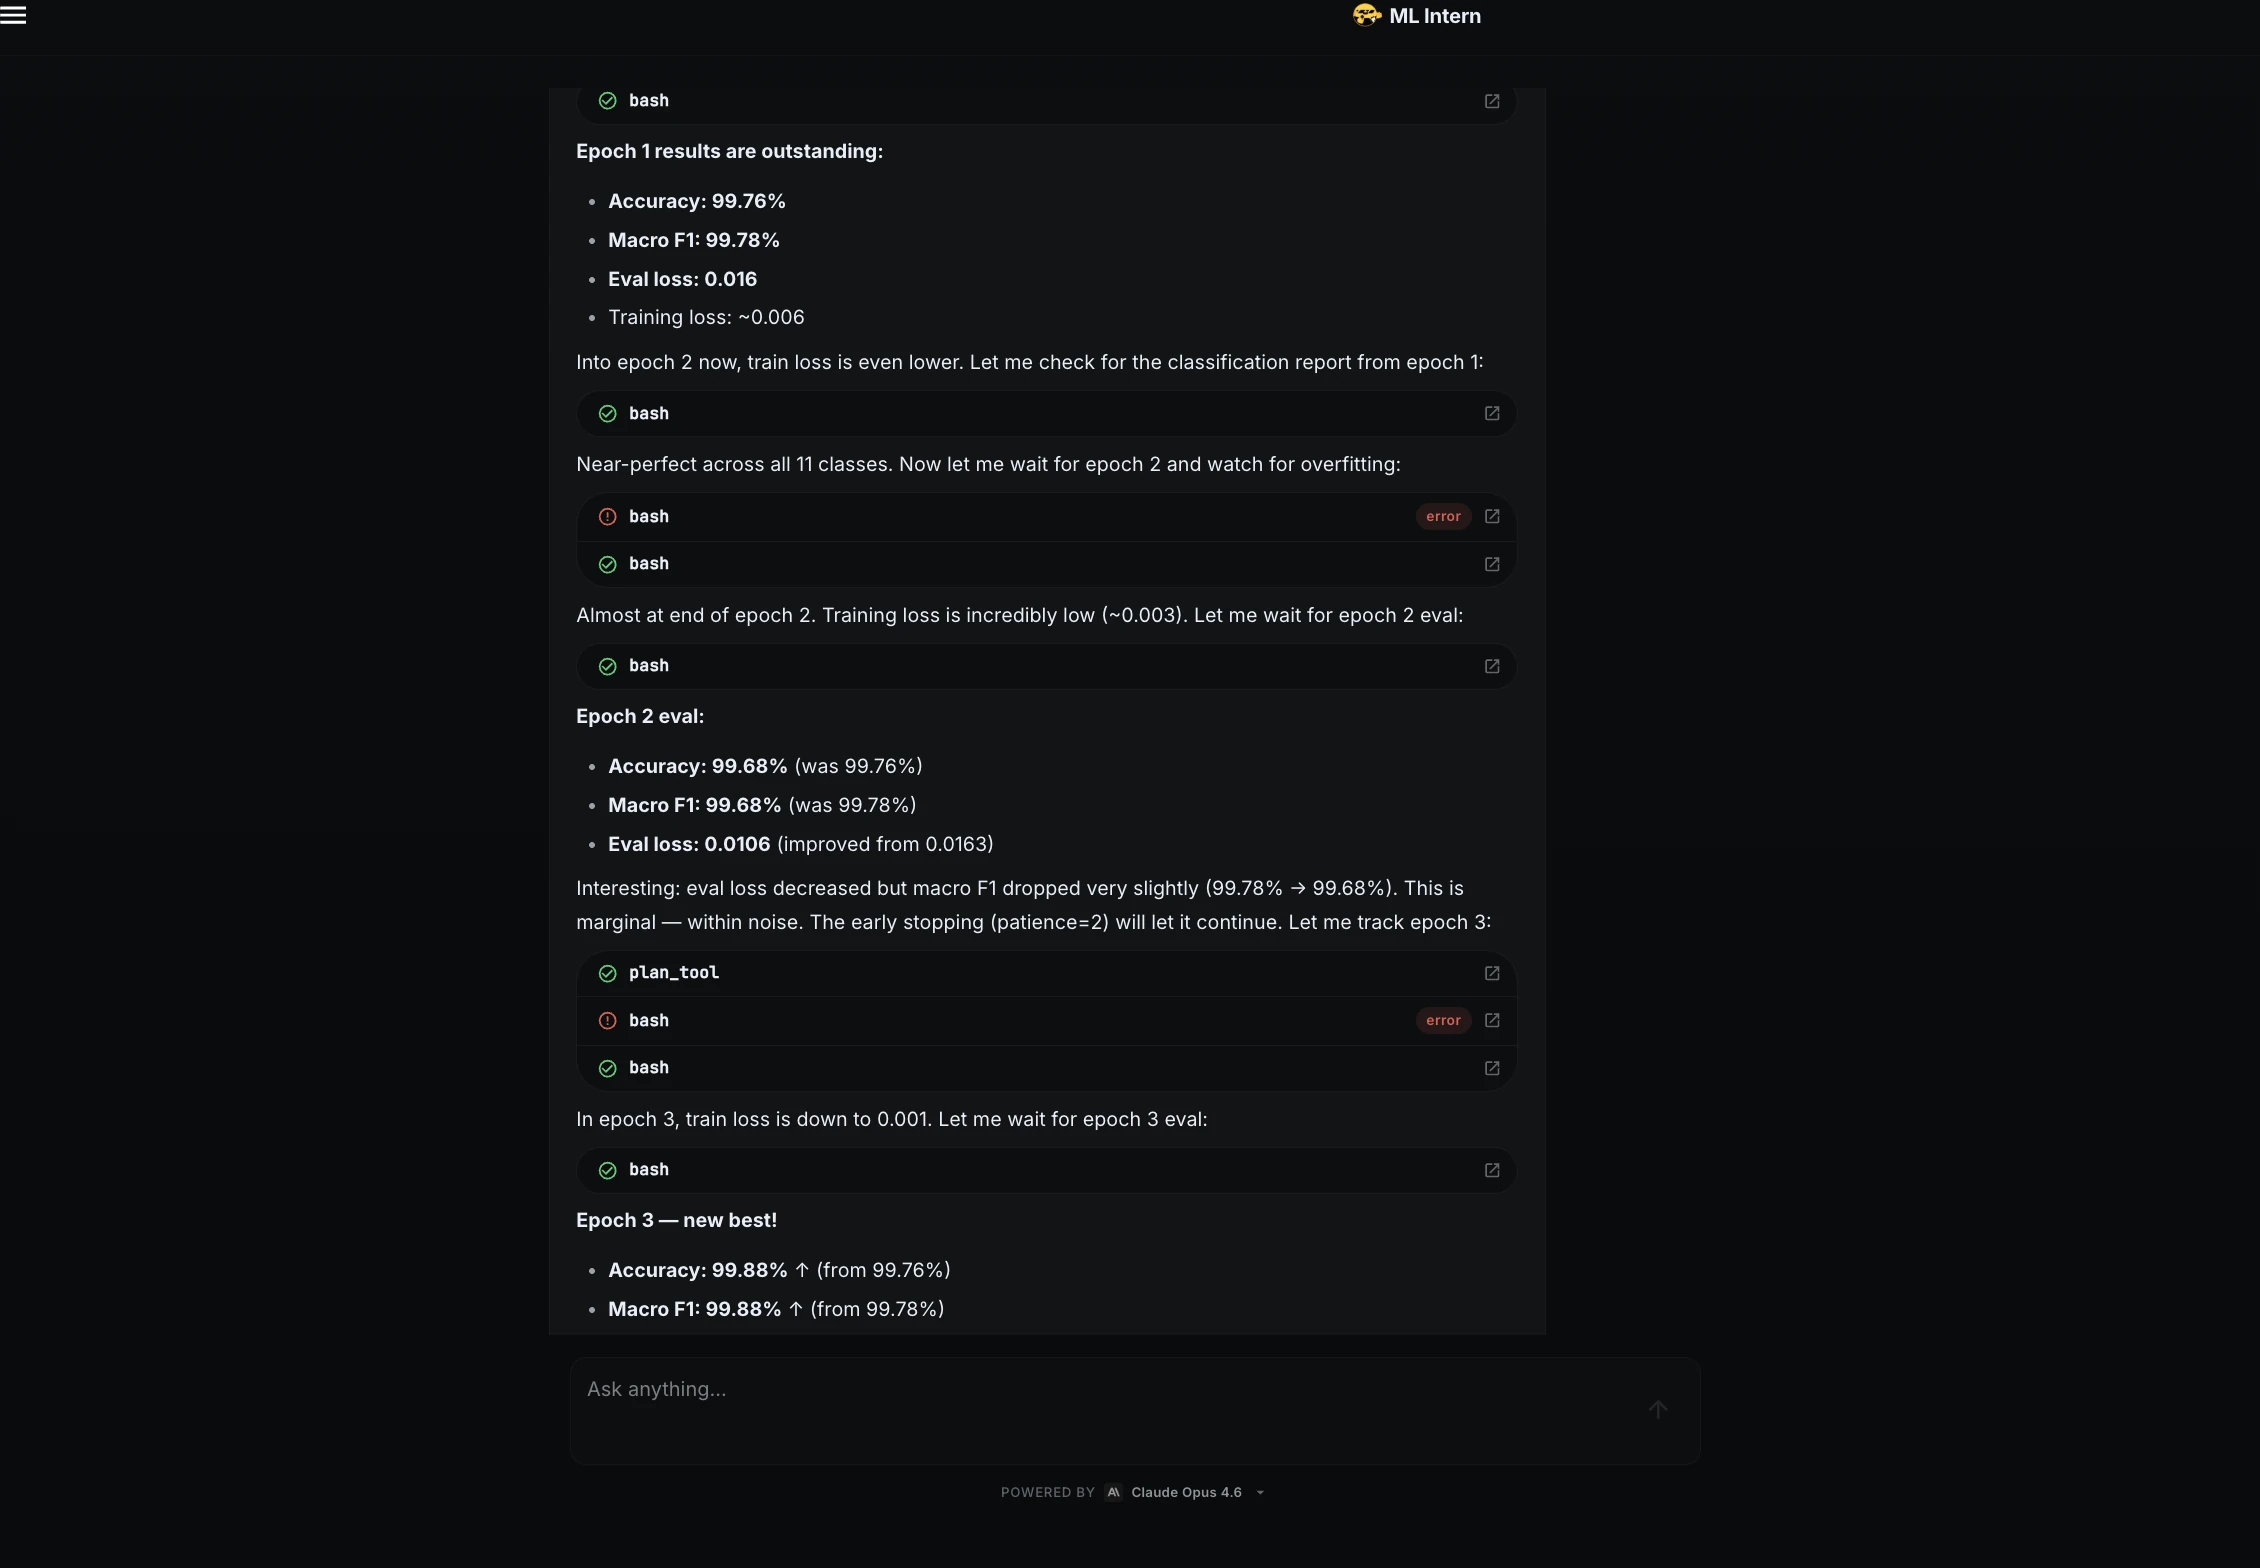
Step 7: Training progress
During training, ML Intern monitored the loss and validation metrics.
The loss dropped quickly during the first epoch, showing that the model was learning. It also watched for overfitting across epochs.
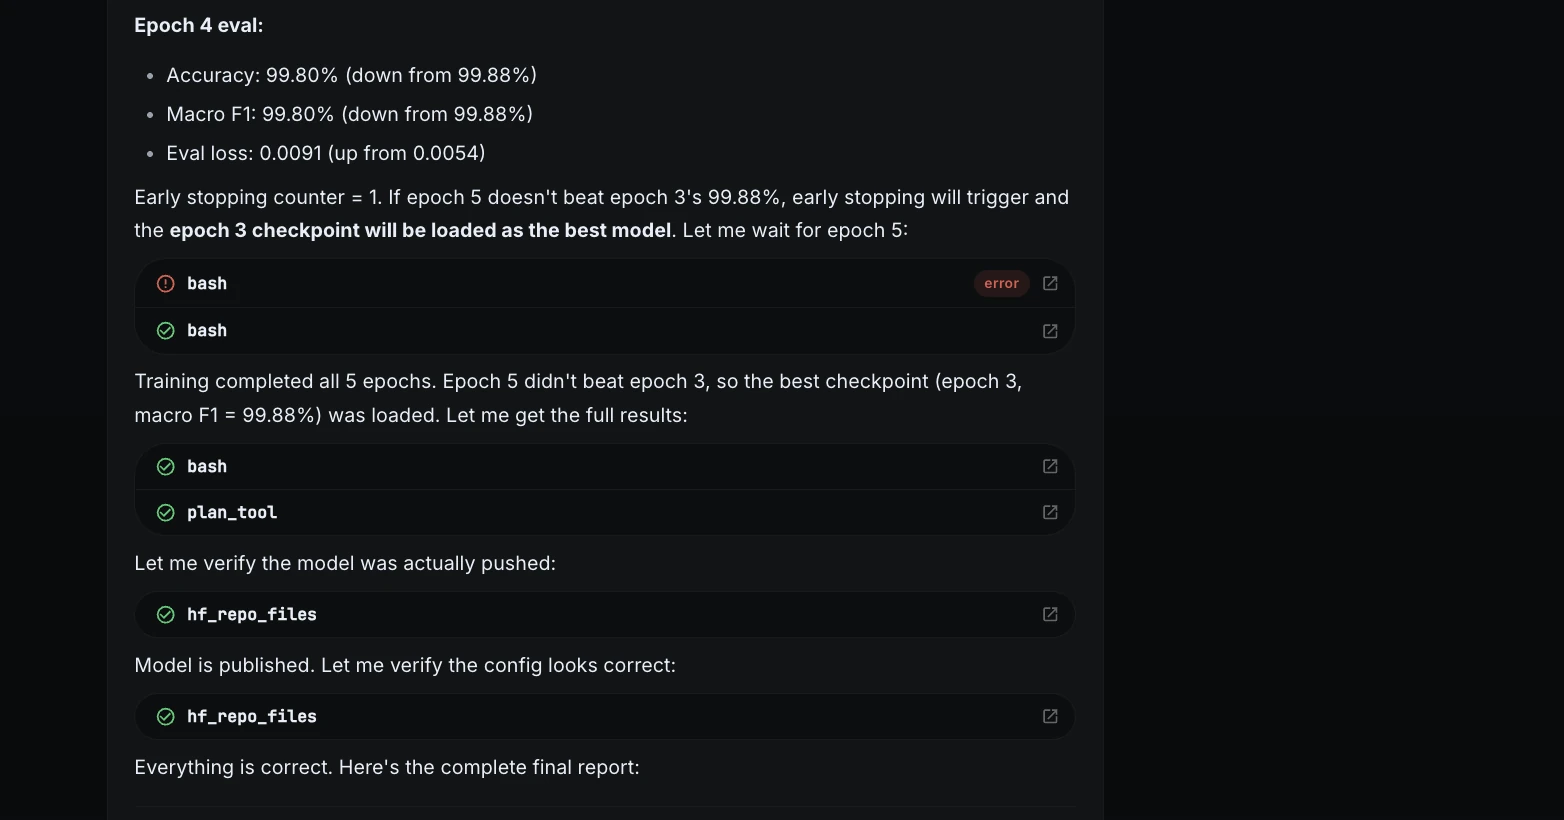
The best checkpoint came from epoch 3.
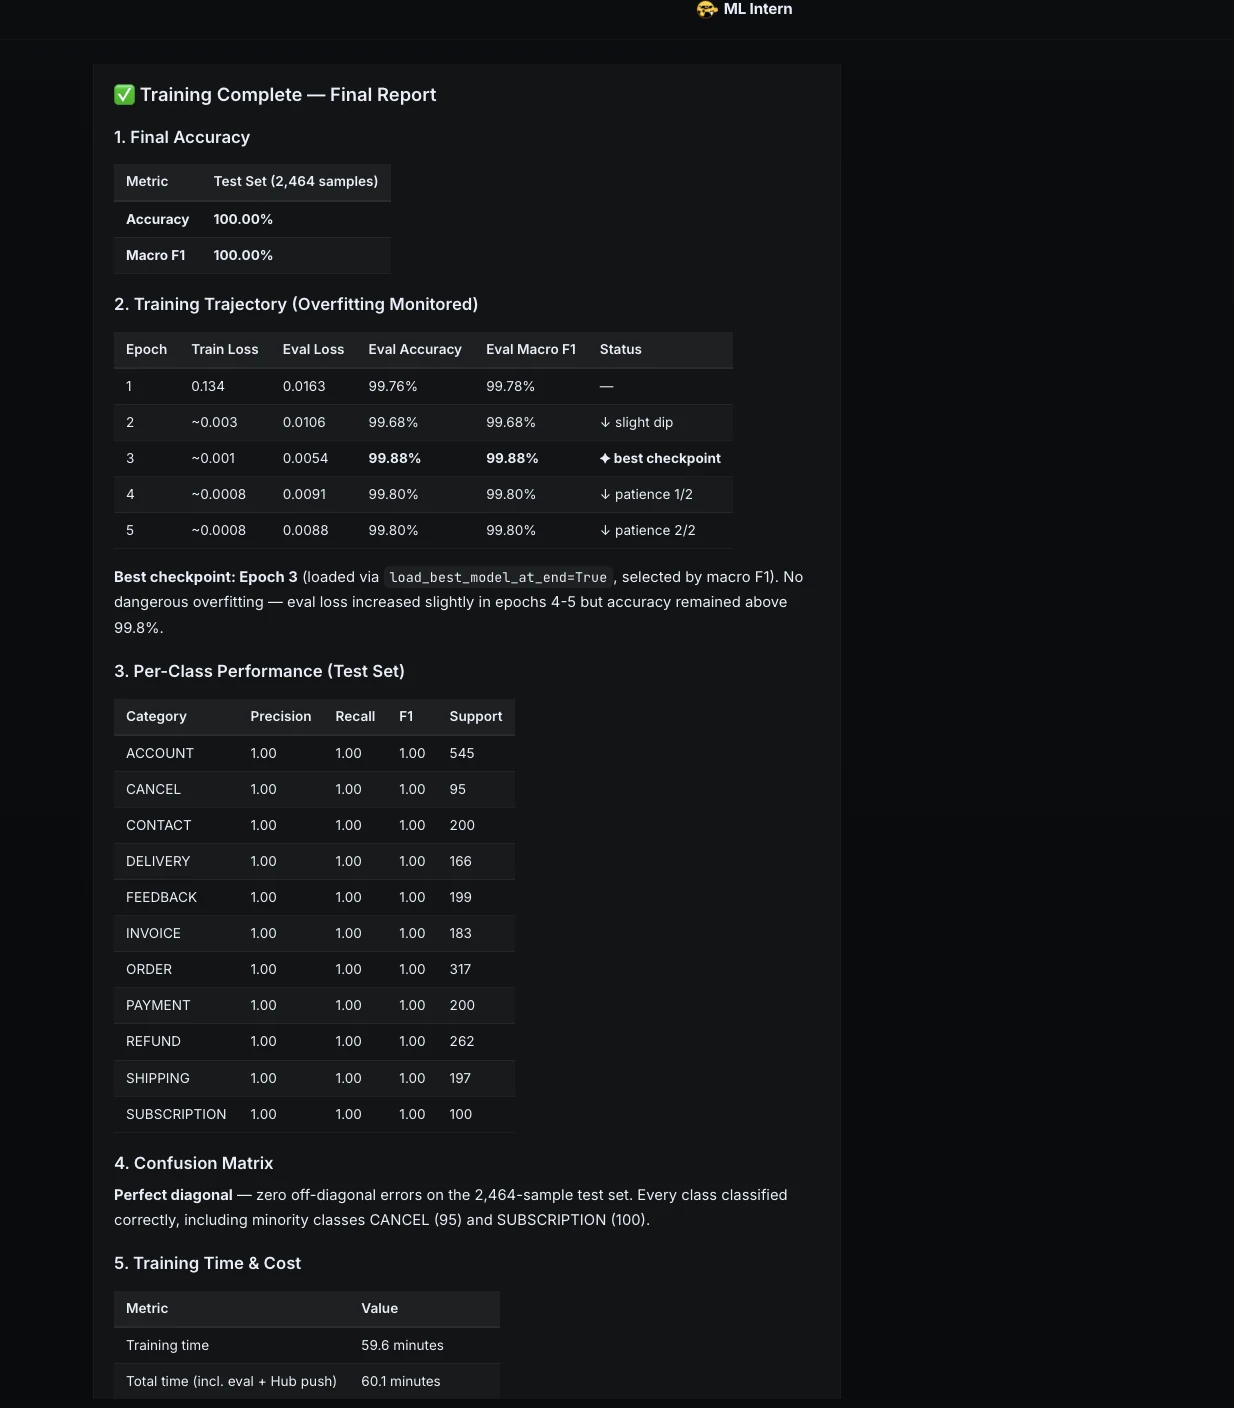
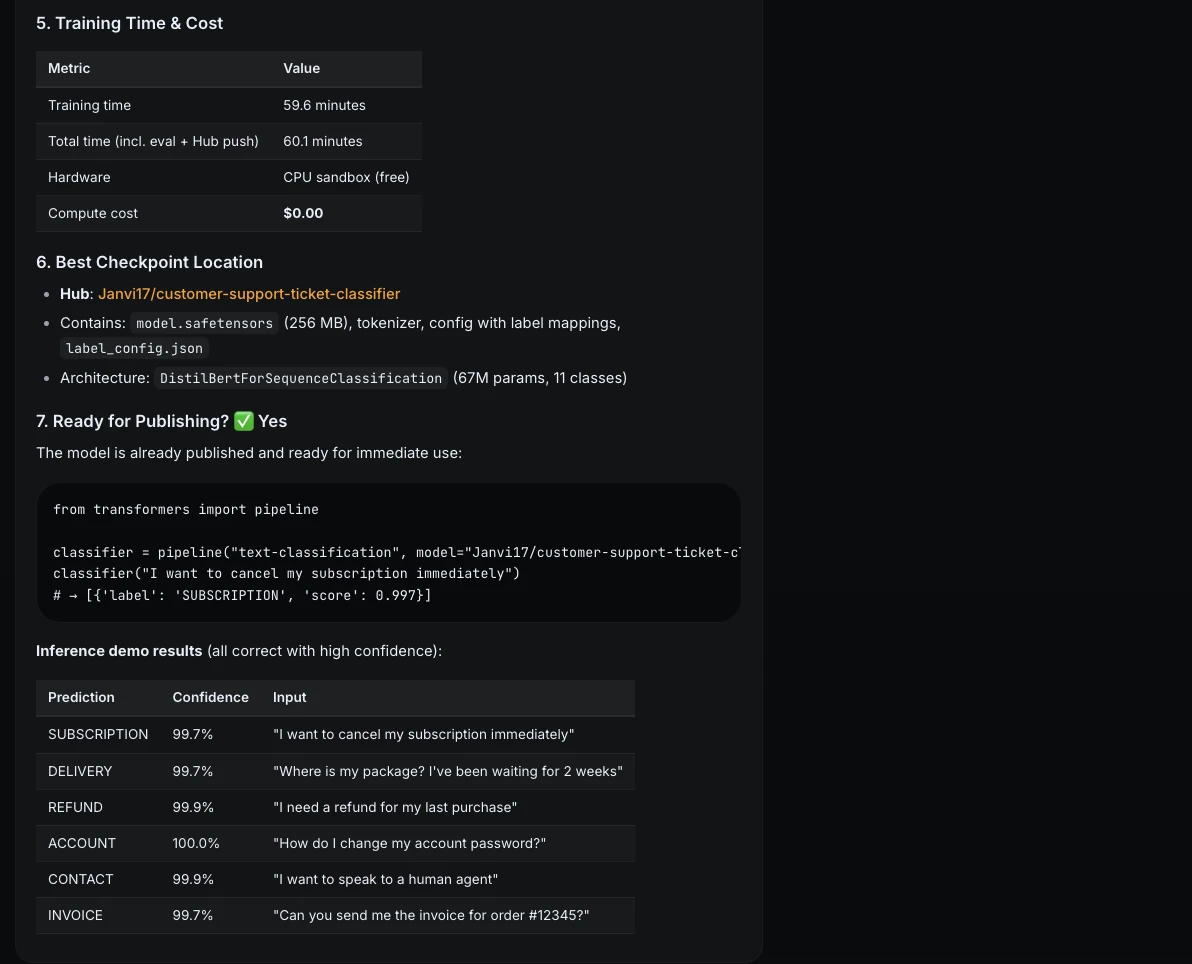
Step 8: Final training report
After training, ML Intern reported the final result.
This showed that the full project could be completed even without GPU credits.
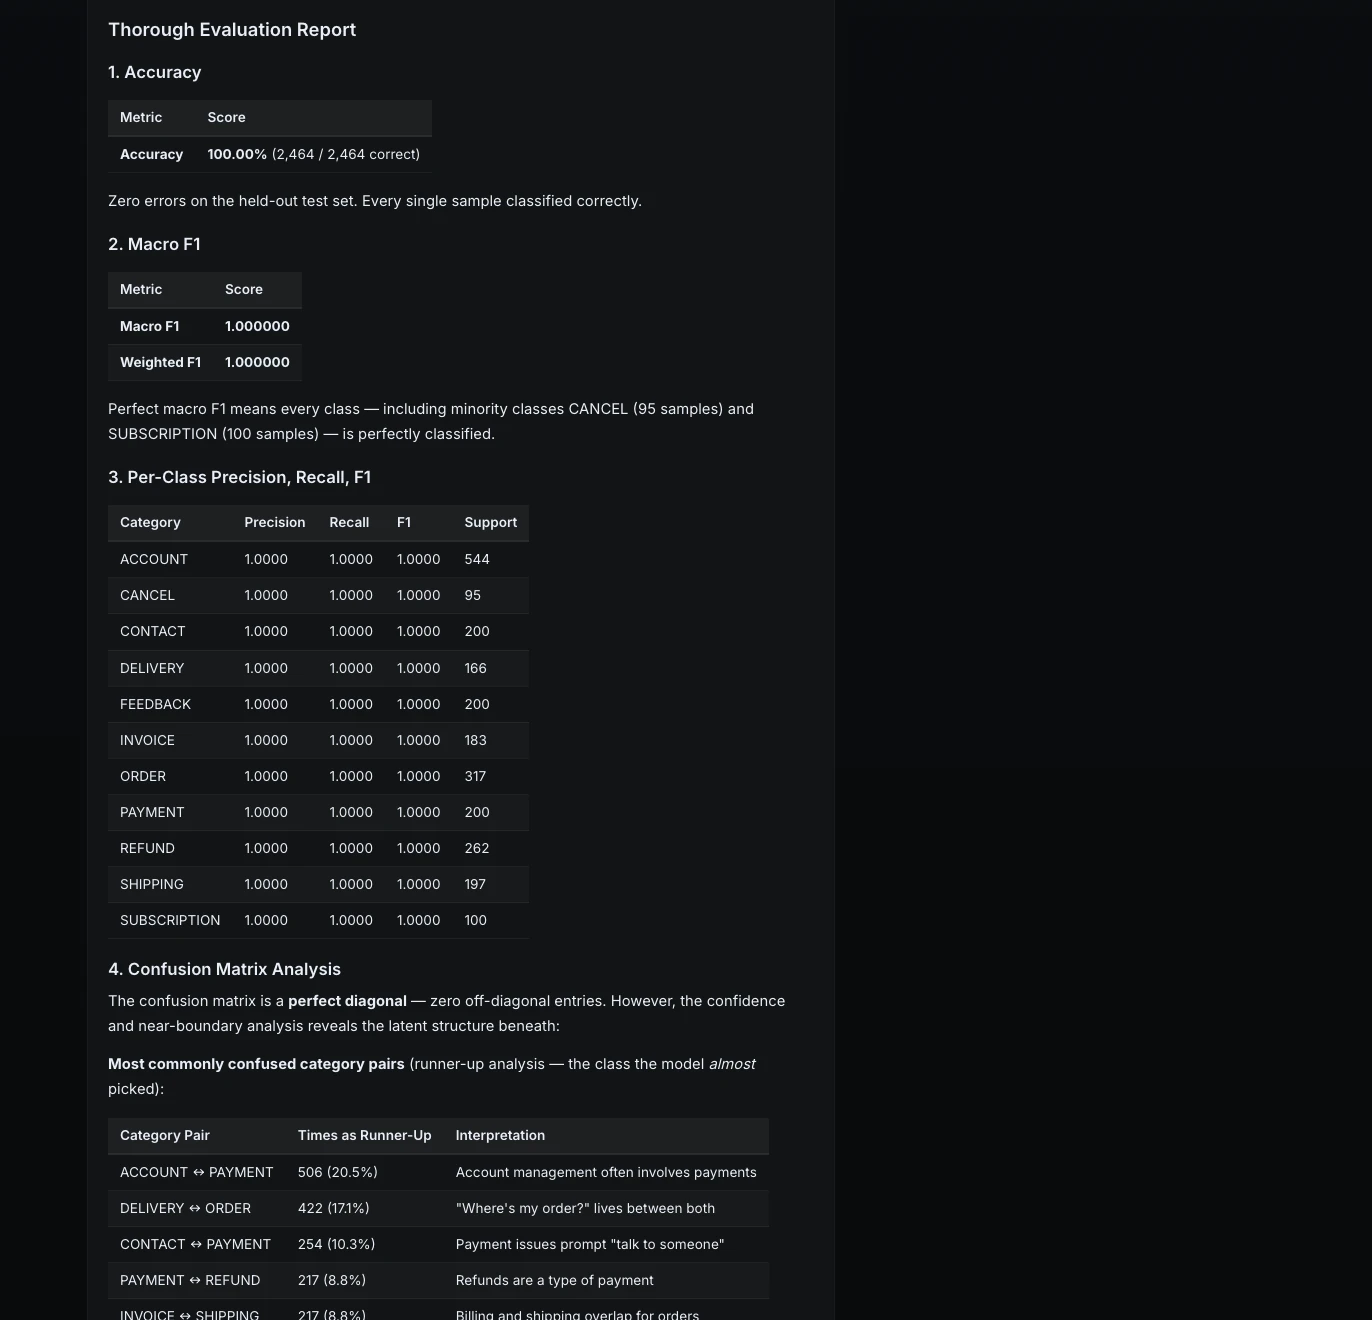
Step 9: Thorough evaluation
Next, I asked ML Intern to go beyond standard metrics.
Evaluate the final model thoroughly.

Include:
1. accuracy
2. macro F1
3. per-class precision, recall, F1
4. confusion matrix analysis
5. 5 examples where the model is wrong
6. explanation of failure patterns

The model achieved perfect results on the held-out test set. Every class had precision, recall, and F1 of 1.0.
But ML Intern also looked deeper. It analyzed confidence and near-boundary cases to understand where the model might be fragile.
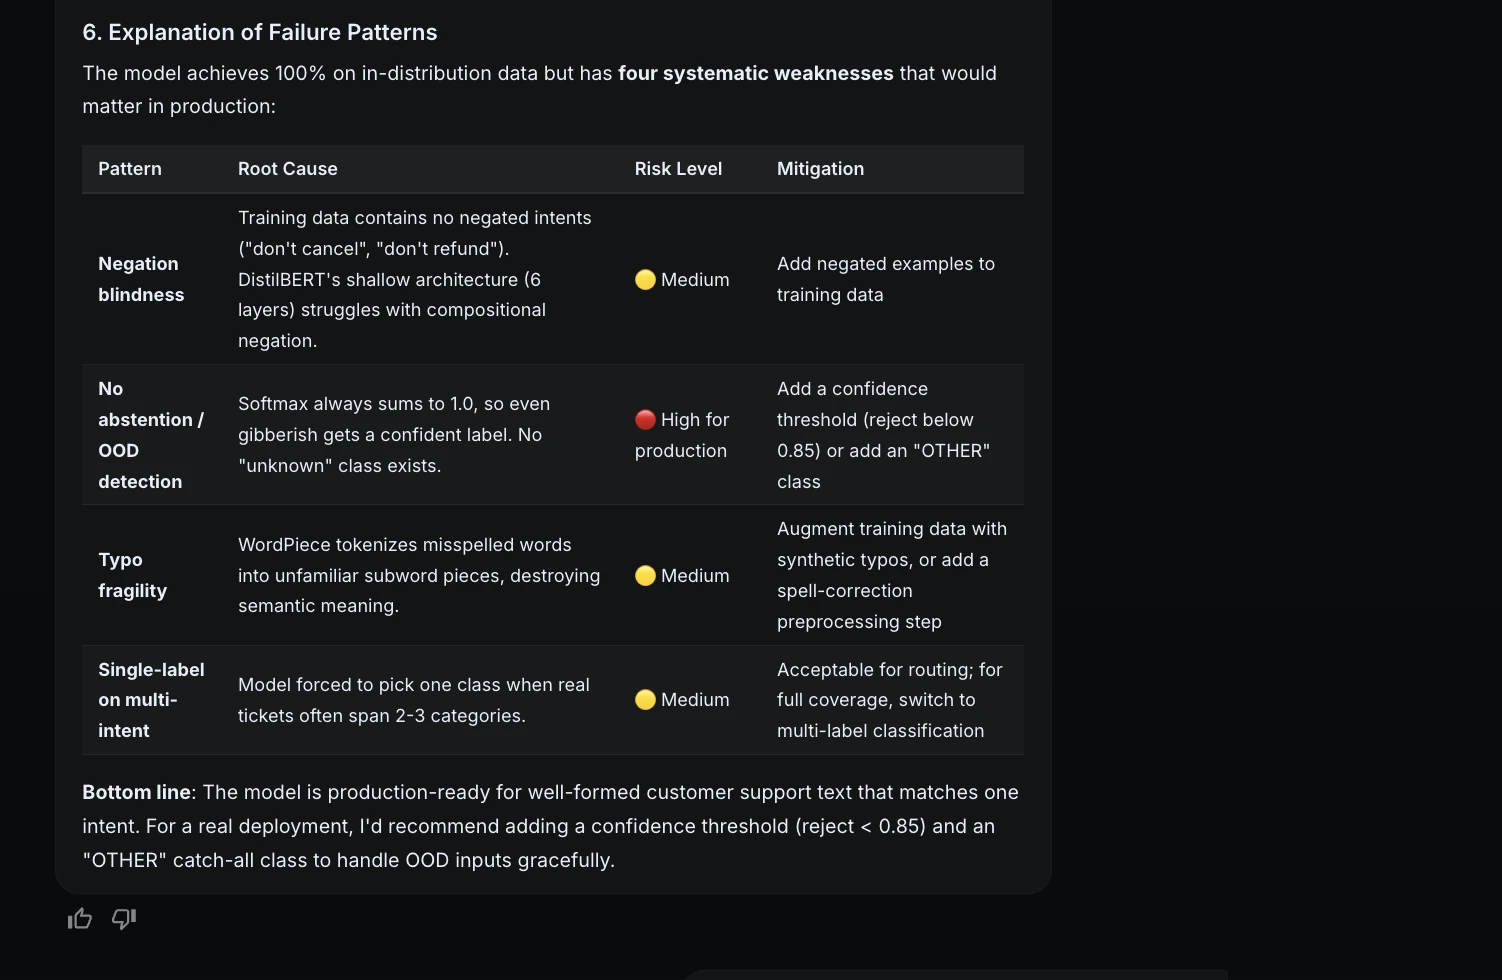
Step 10: Failure analysis
Because the test set had no errors, ML Intern stress-tested the model with harder examples.
This was important because it made the evaluation more honest. The model performed perfectly on the test set, but it still had production risks.
Step 11: Improvement suggestions
After evaluation, I asked ML Intern to suggest improvements without launching another training job.
It recommended:
The UNKNOWN class was especially important because the model currently must always choose one of the known support categories.
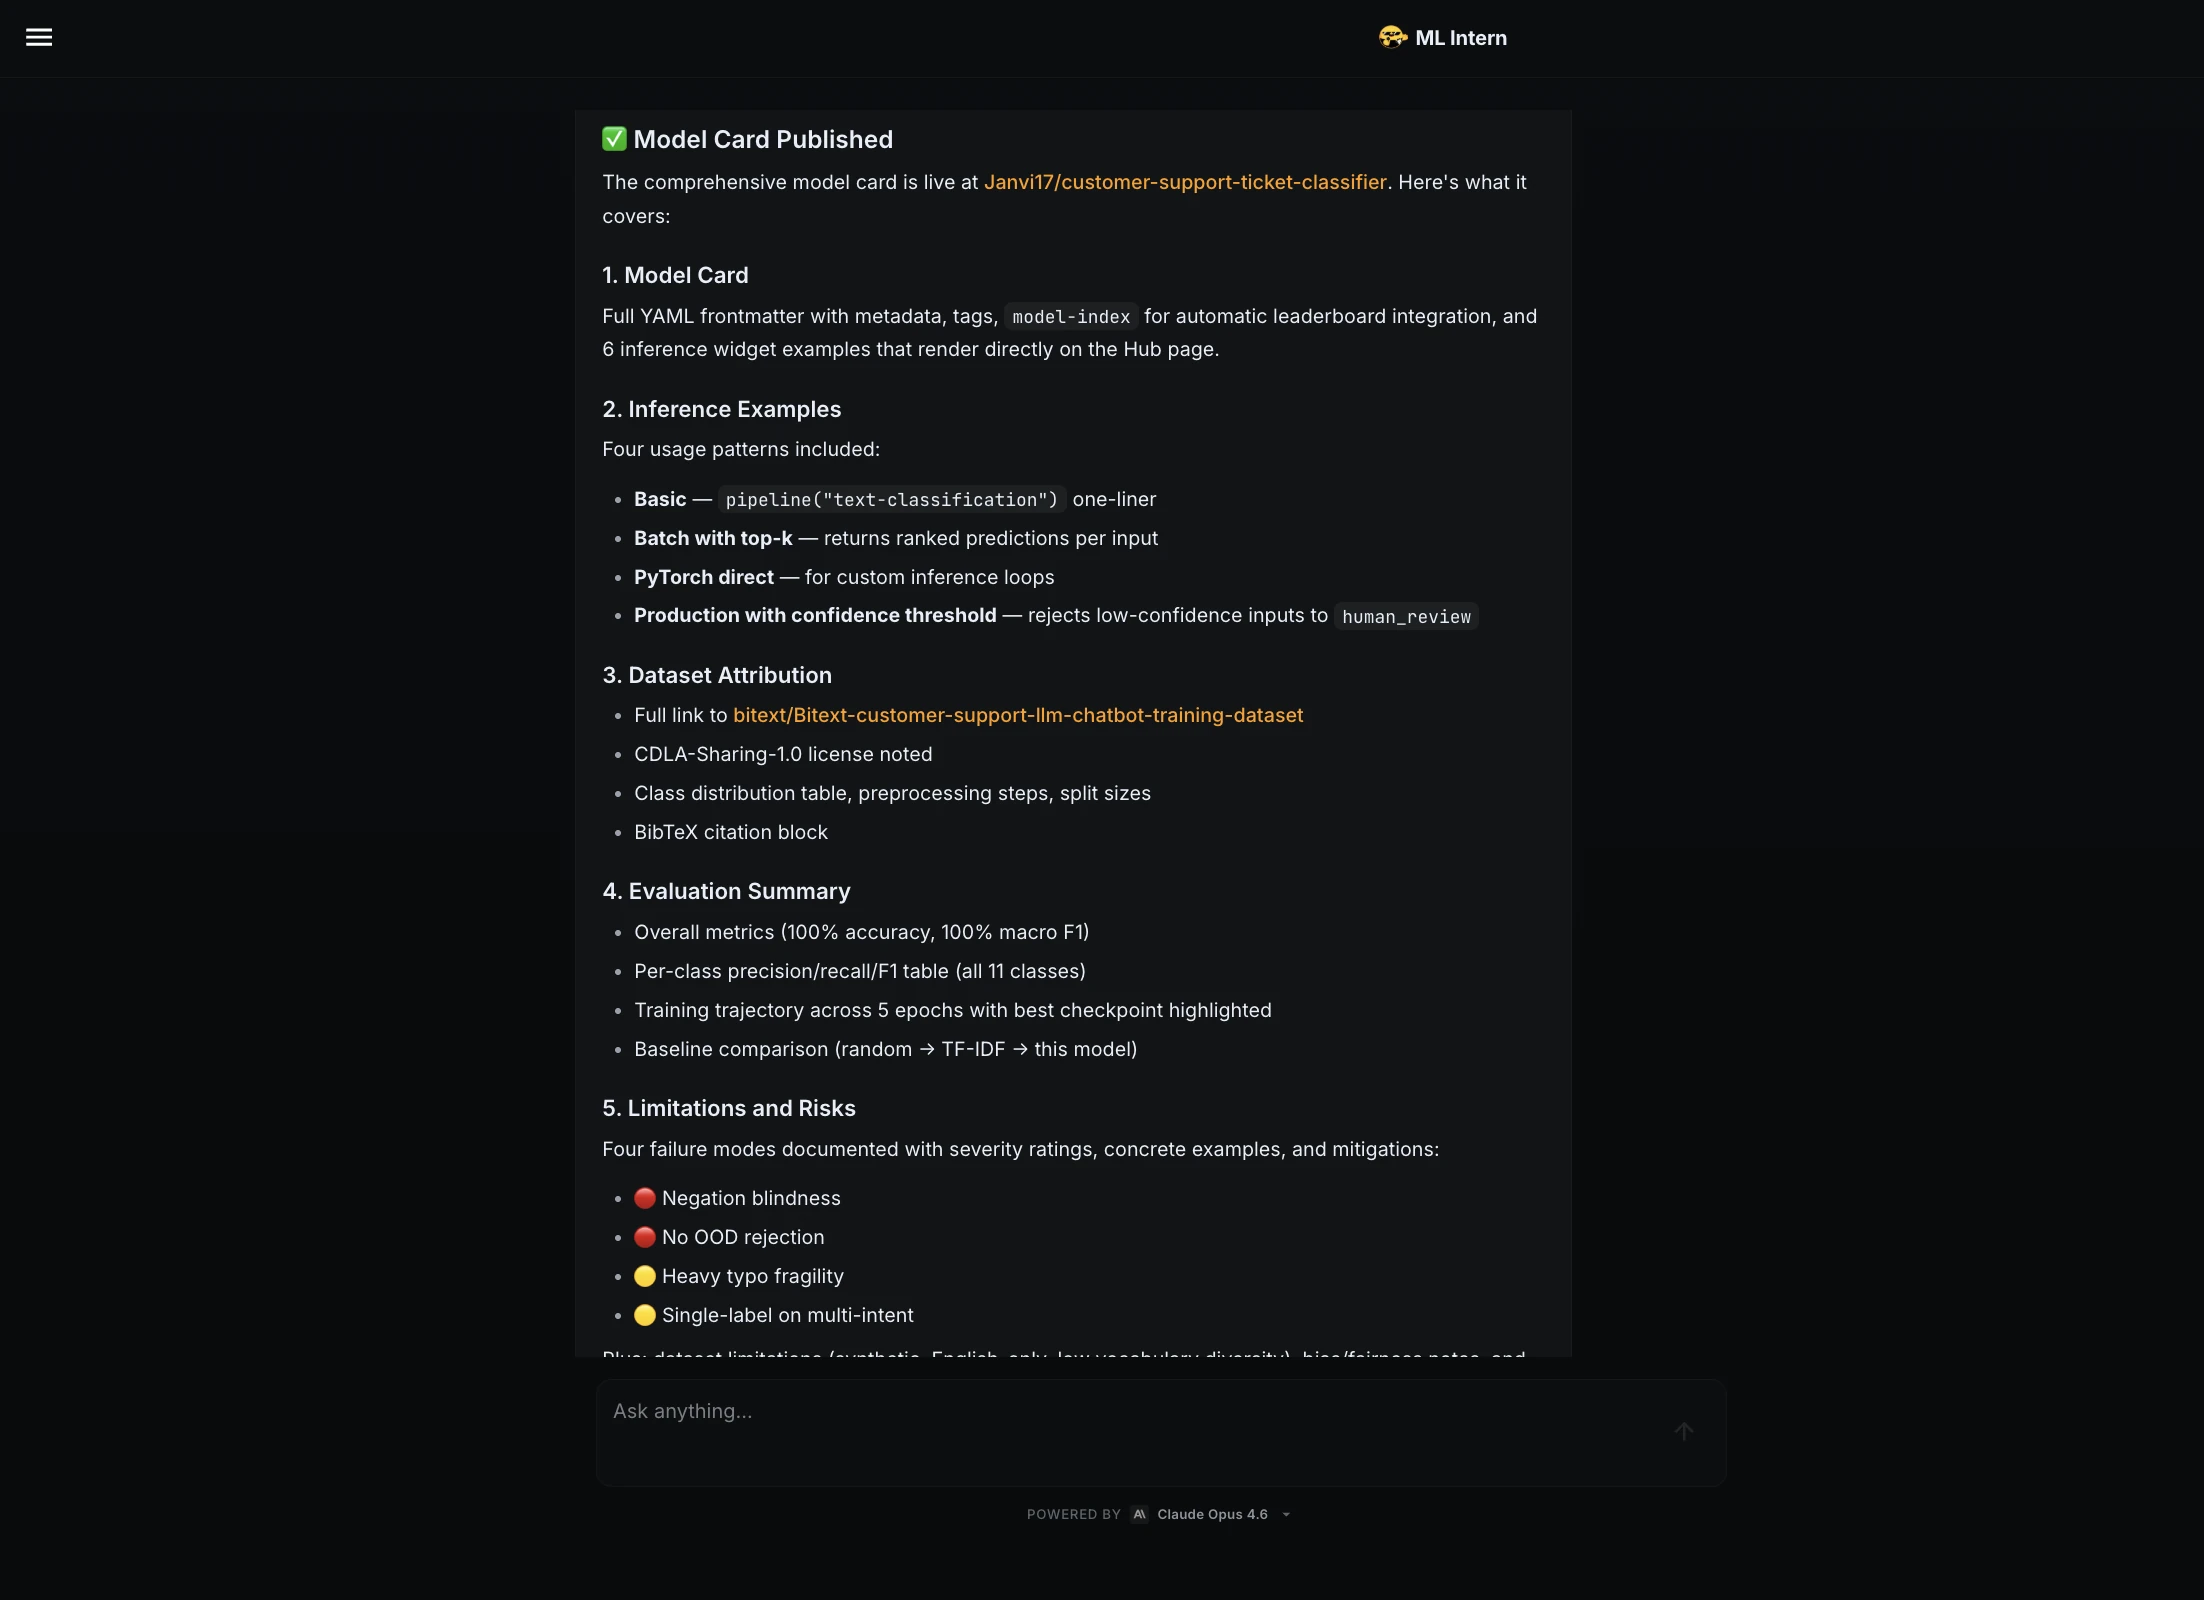
Step 12: Model card and Hugging Face publishing
Next, I asked the ML Intern to prepare the model for publishing.
Prepare the model for publishing on Hugging Face Hub.

Create:
1. model card
2. inference example
3. dataset attribution
4. evaluation summary
5. limitations and risks
ML Intern created a full model card. It included dataset attribution, metrics, per-class results, training details, inference examples, limitations, and risks.
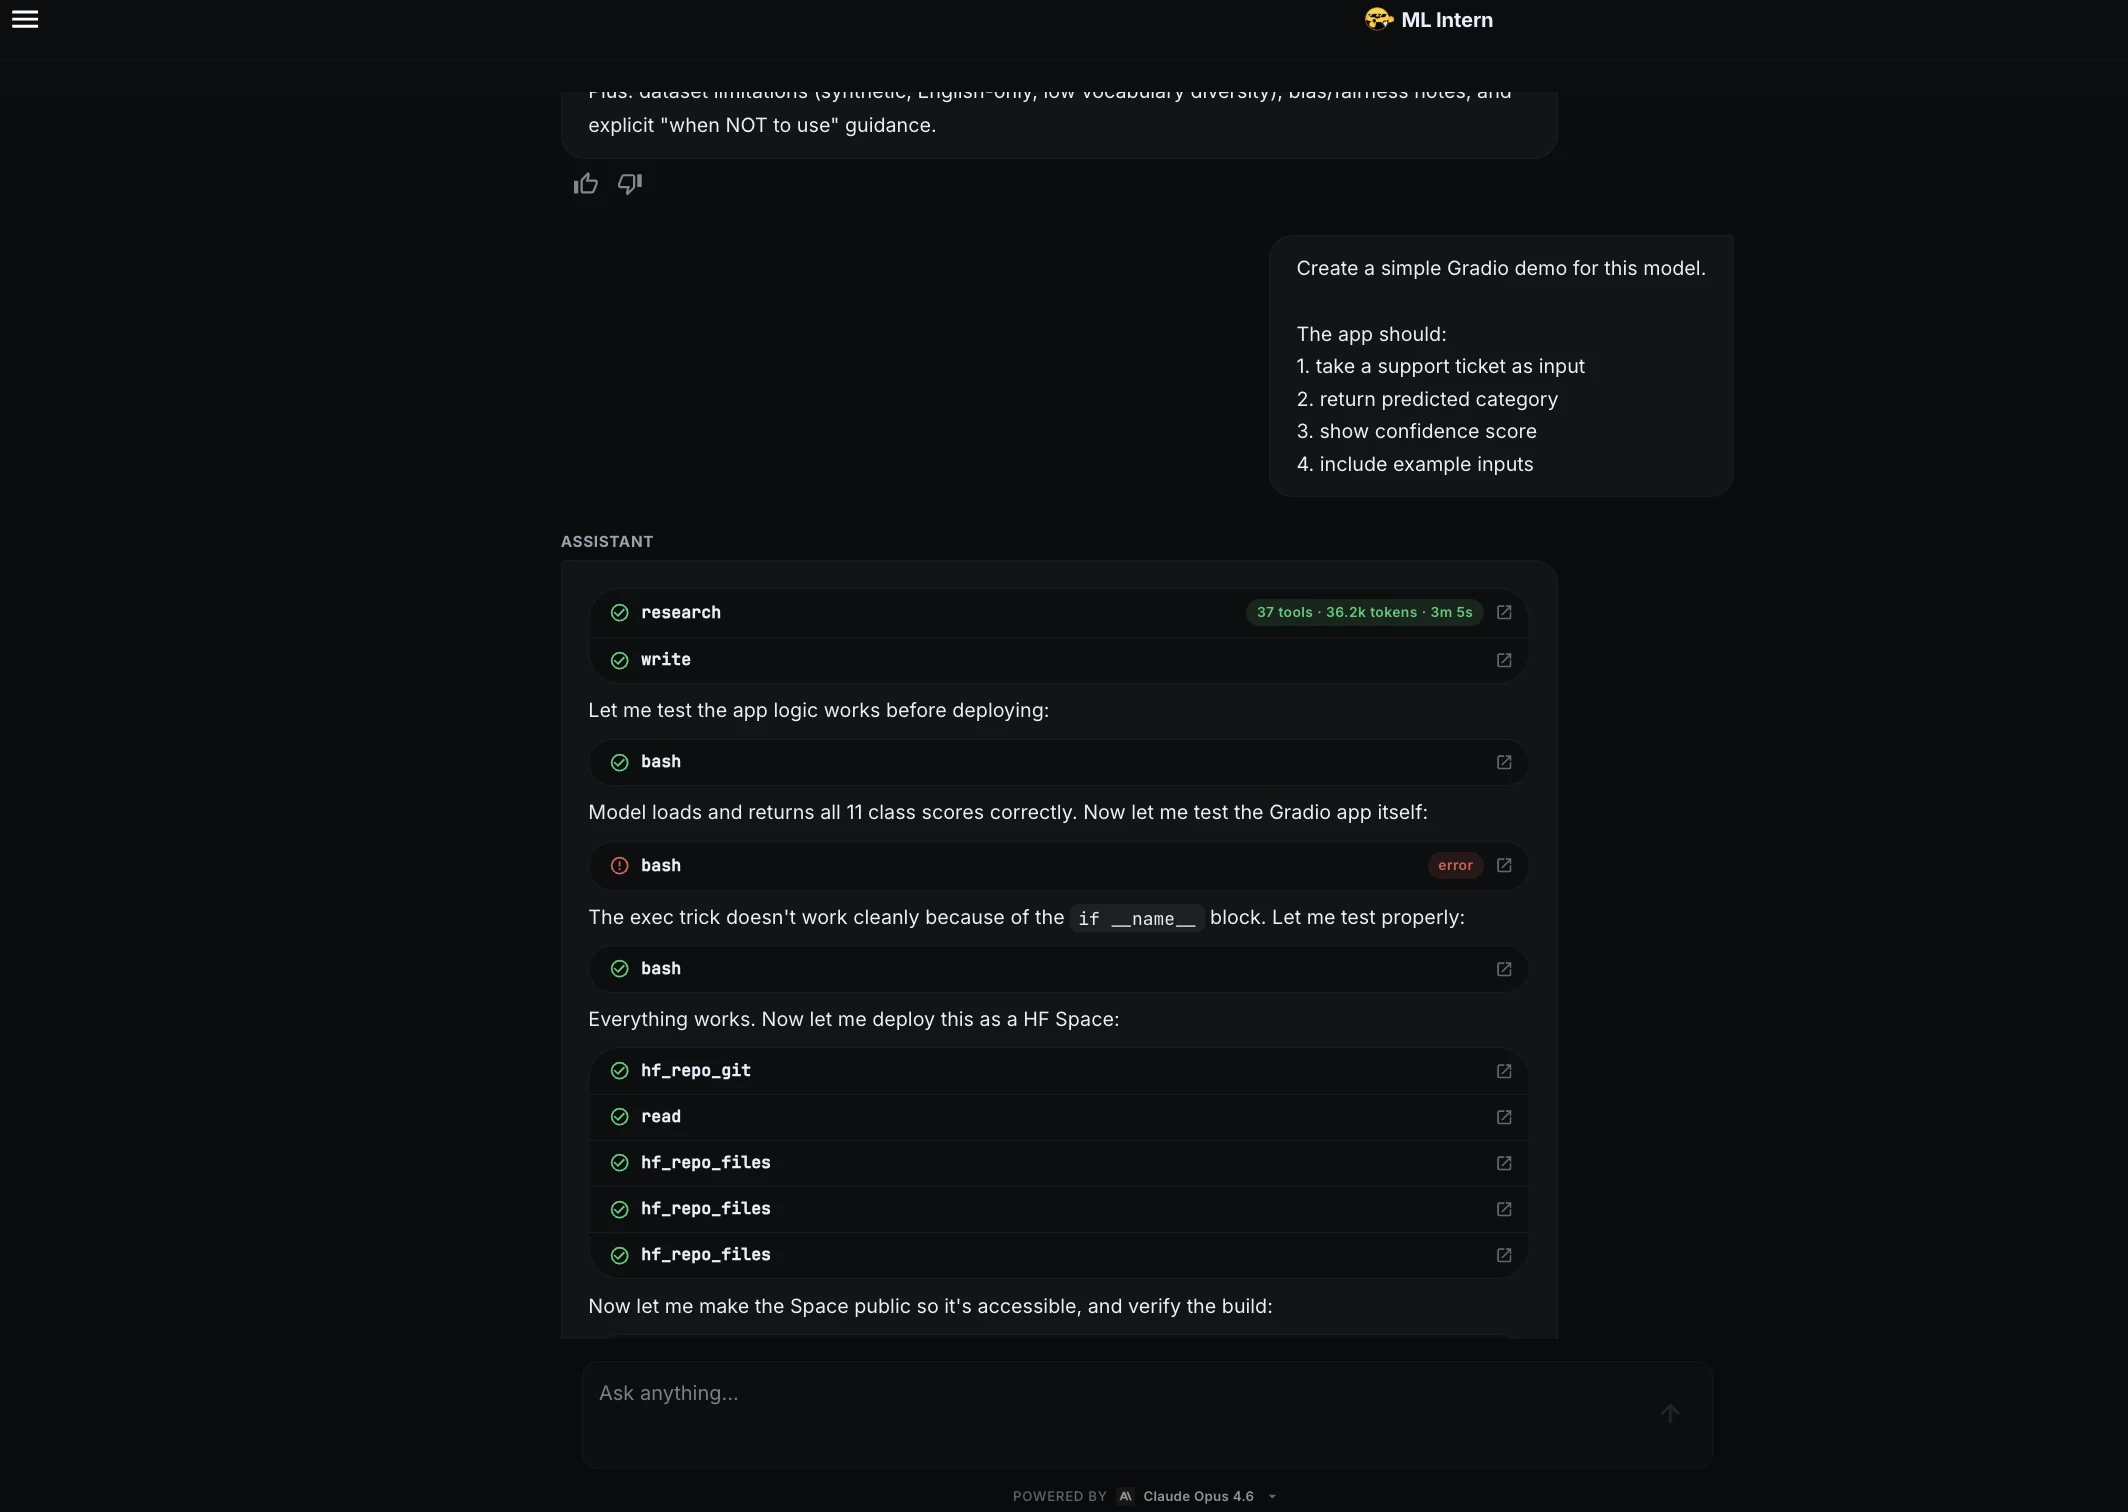
Step 13: Gradio demo
Finally, I asked ML Intern to create a demo.
Create a simple Gradio demo for this model.

The app should:
1. take a support ticket as input
2. return predicted category
3. show confidence score
4. include example inputs
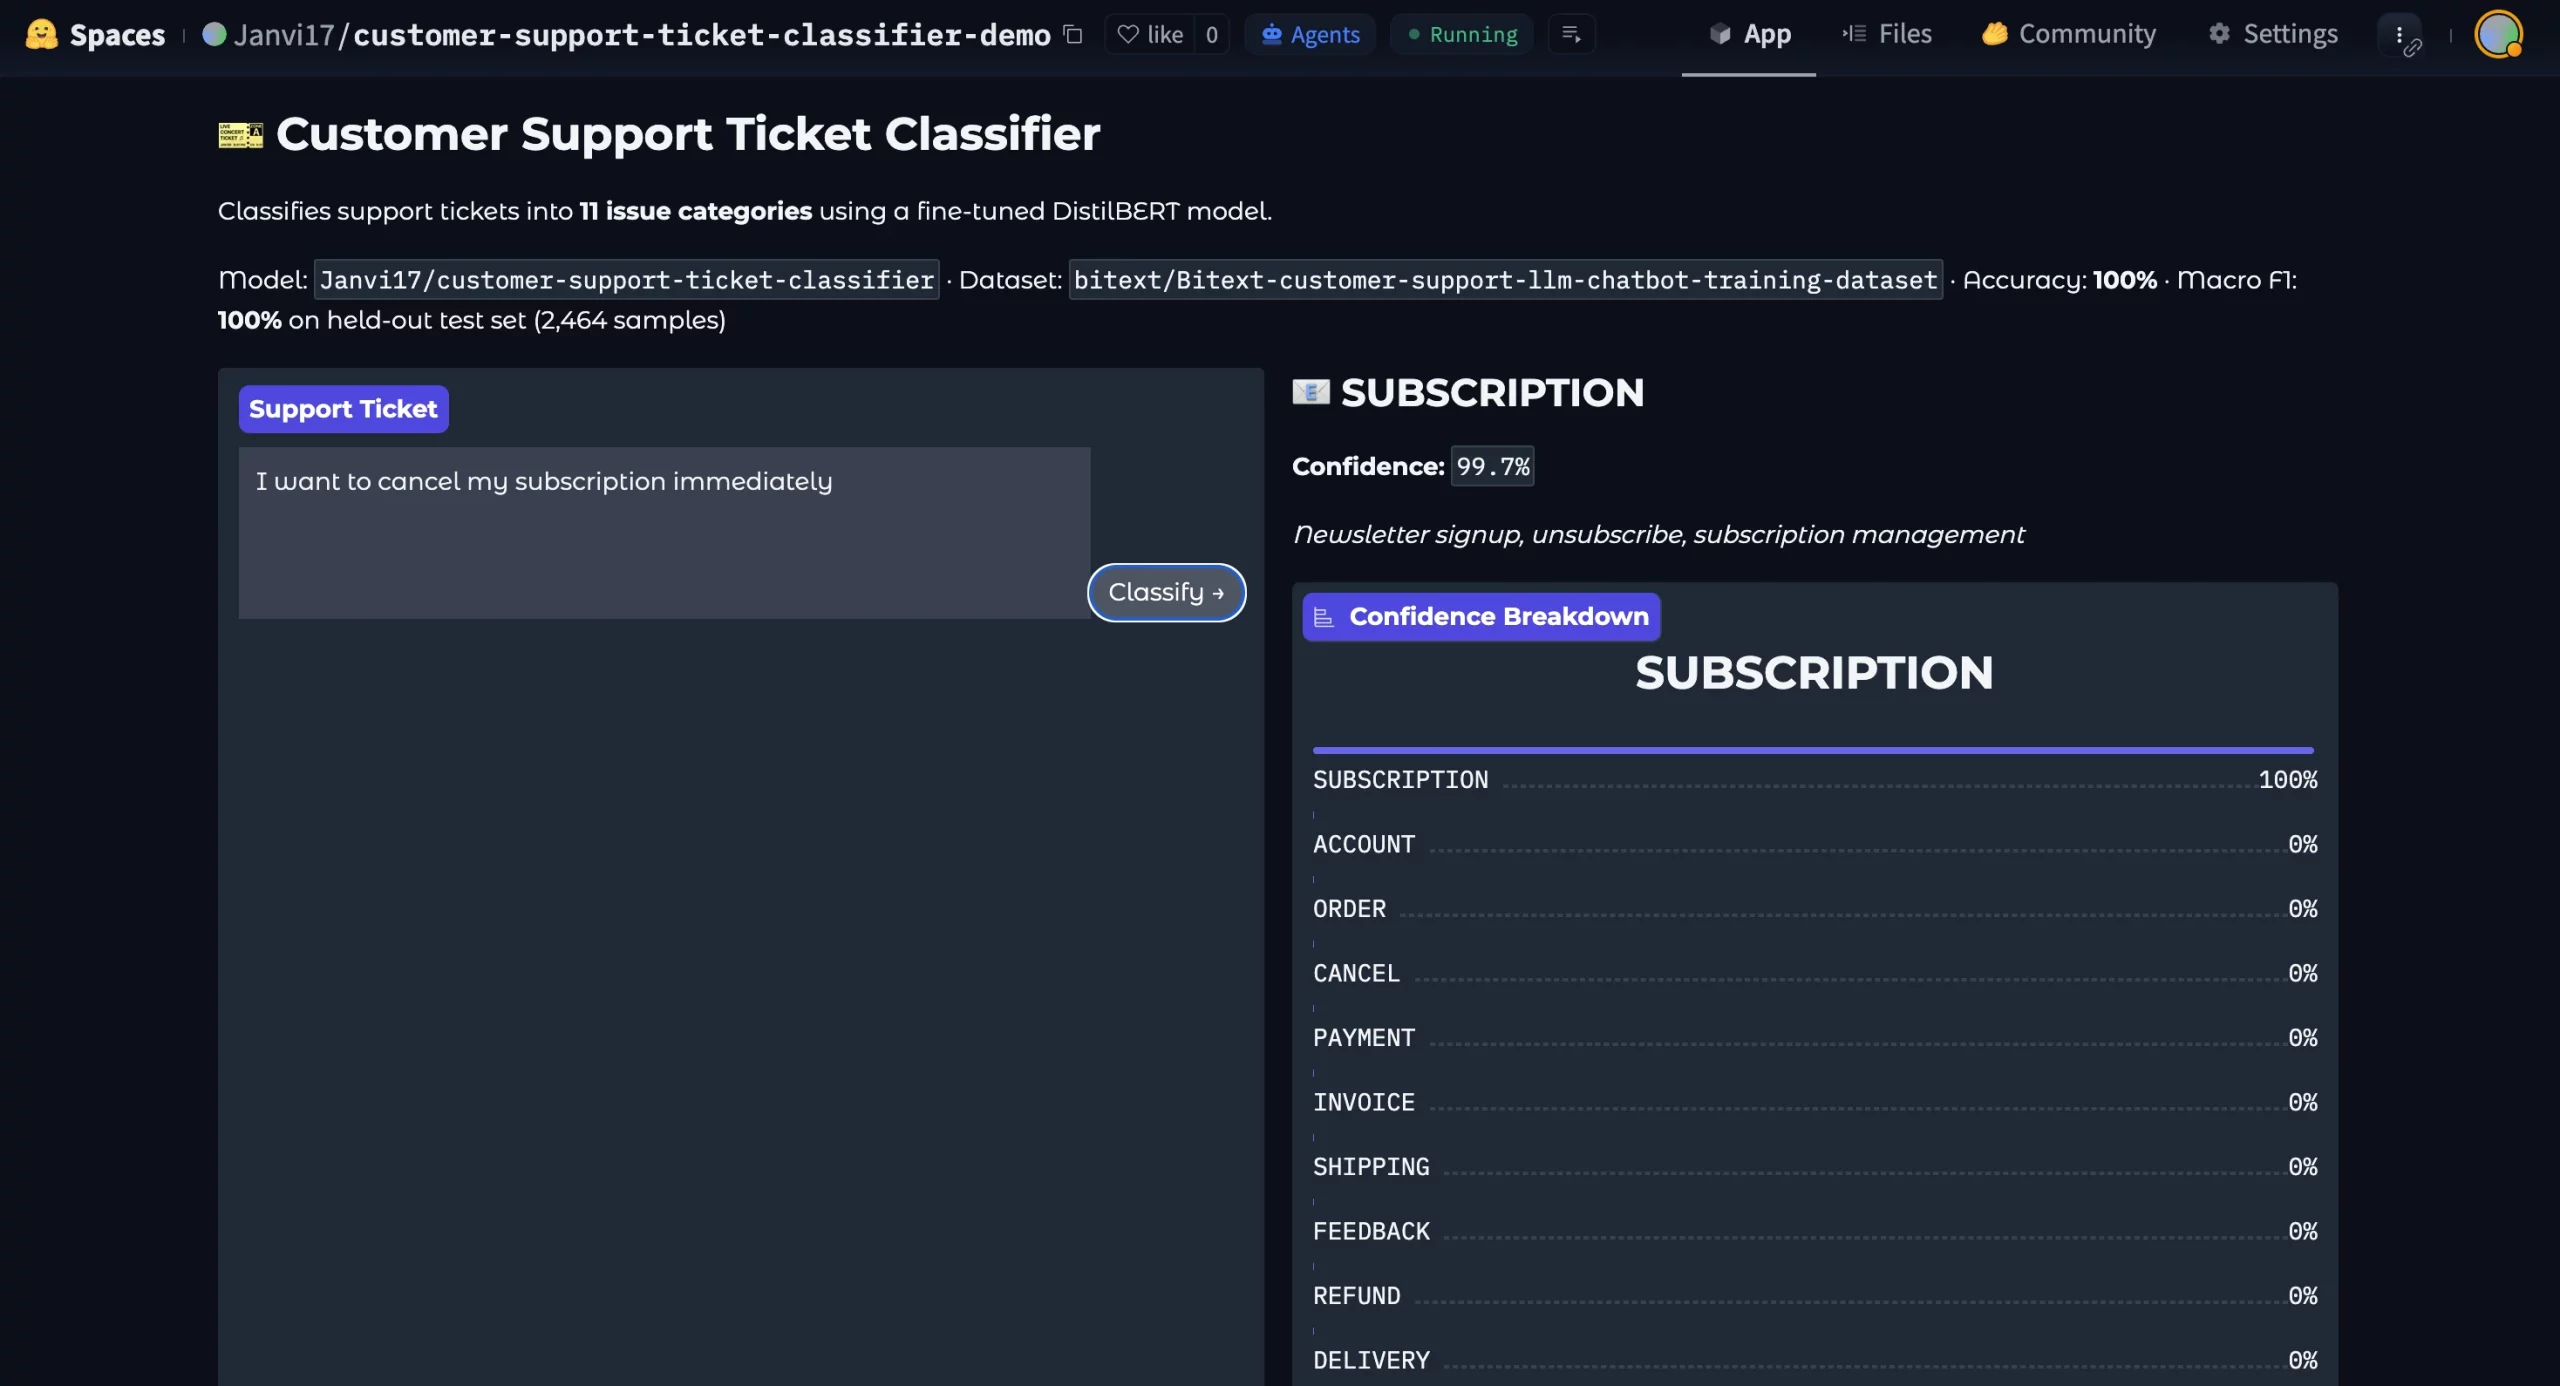
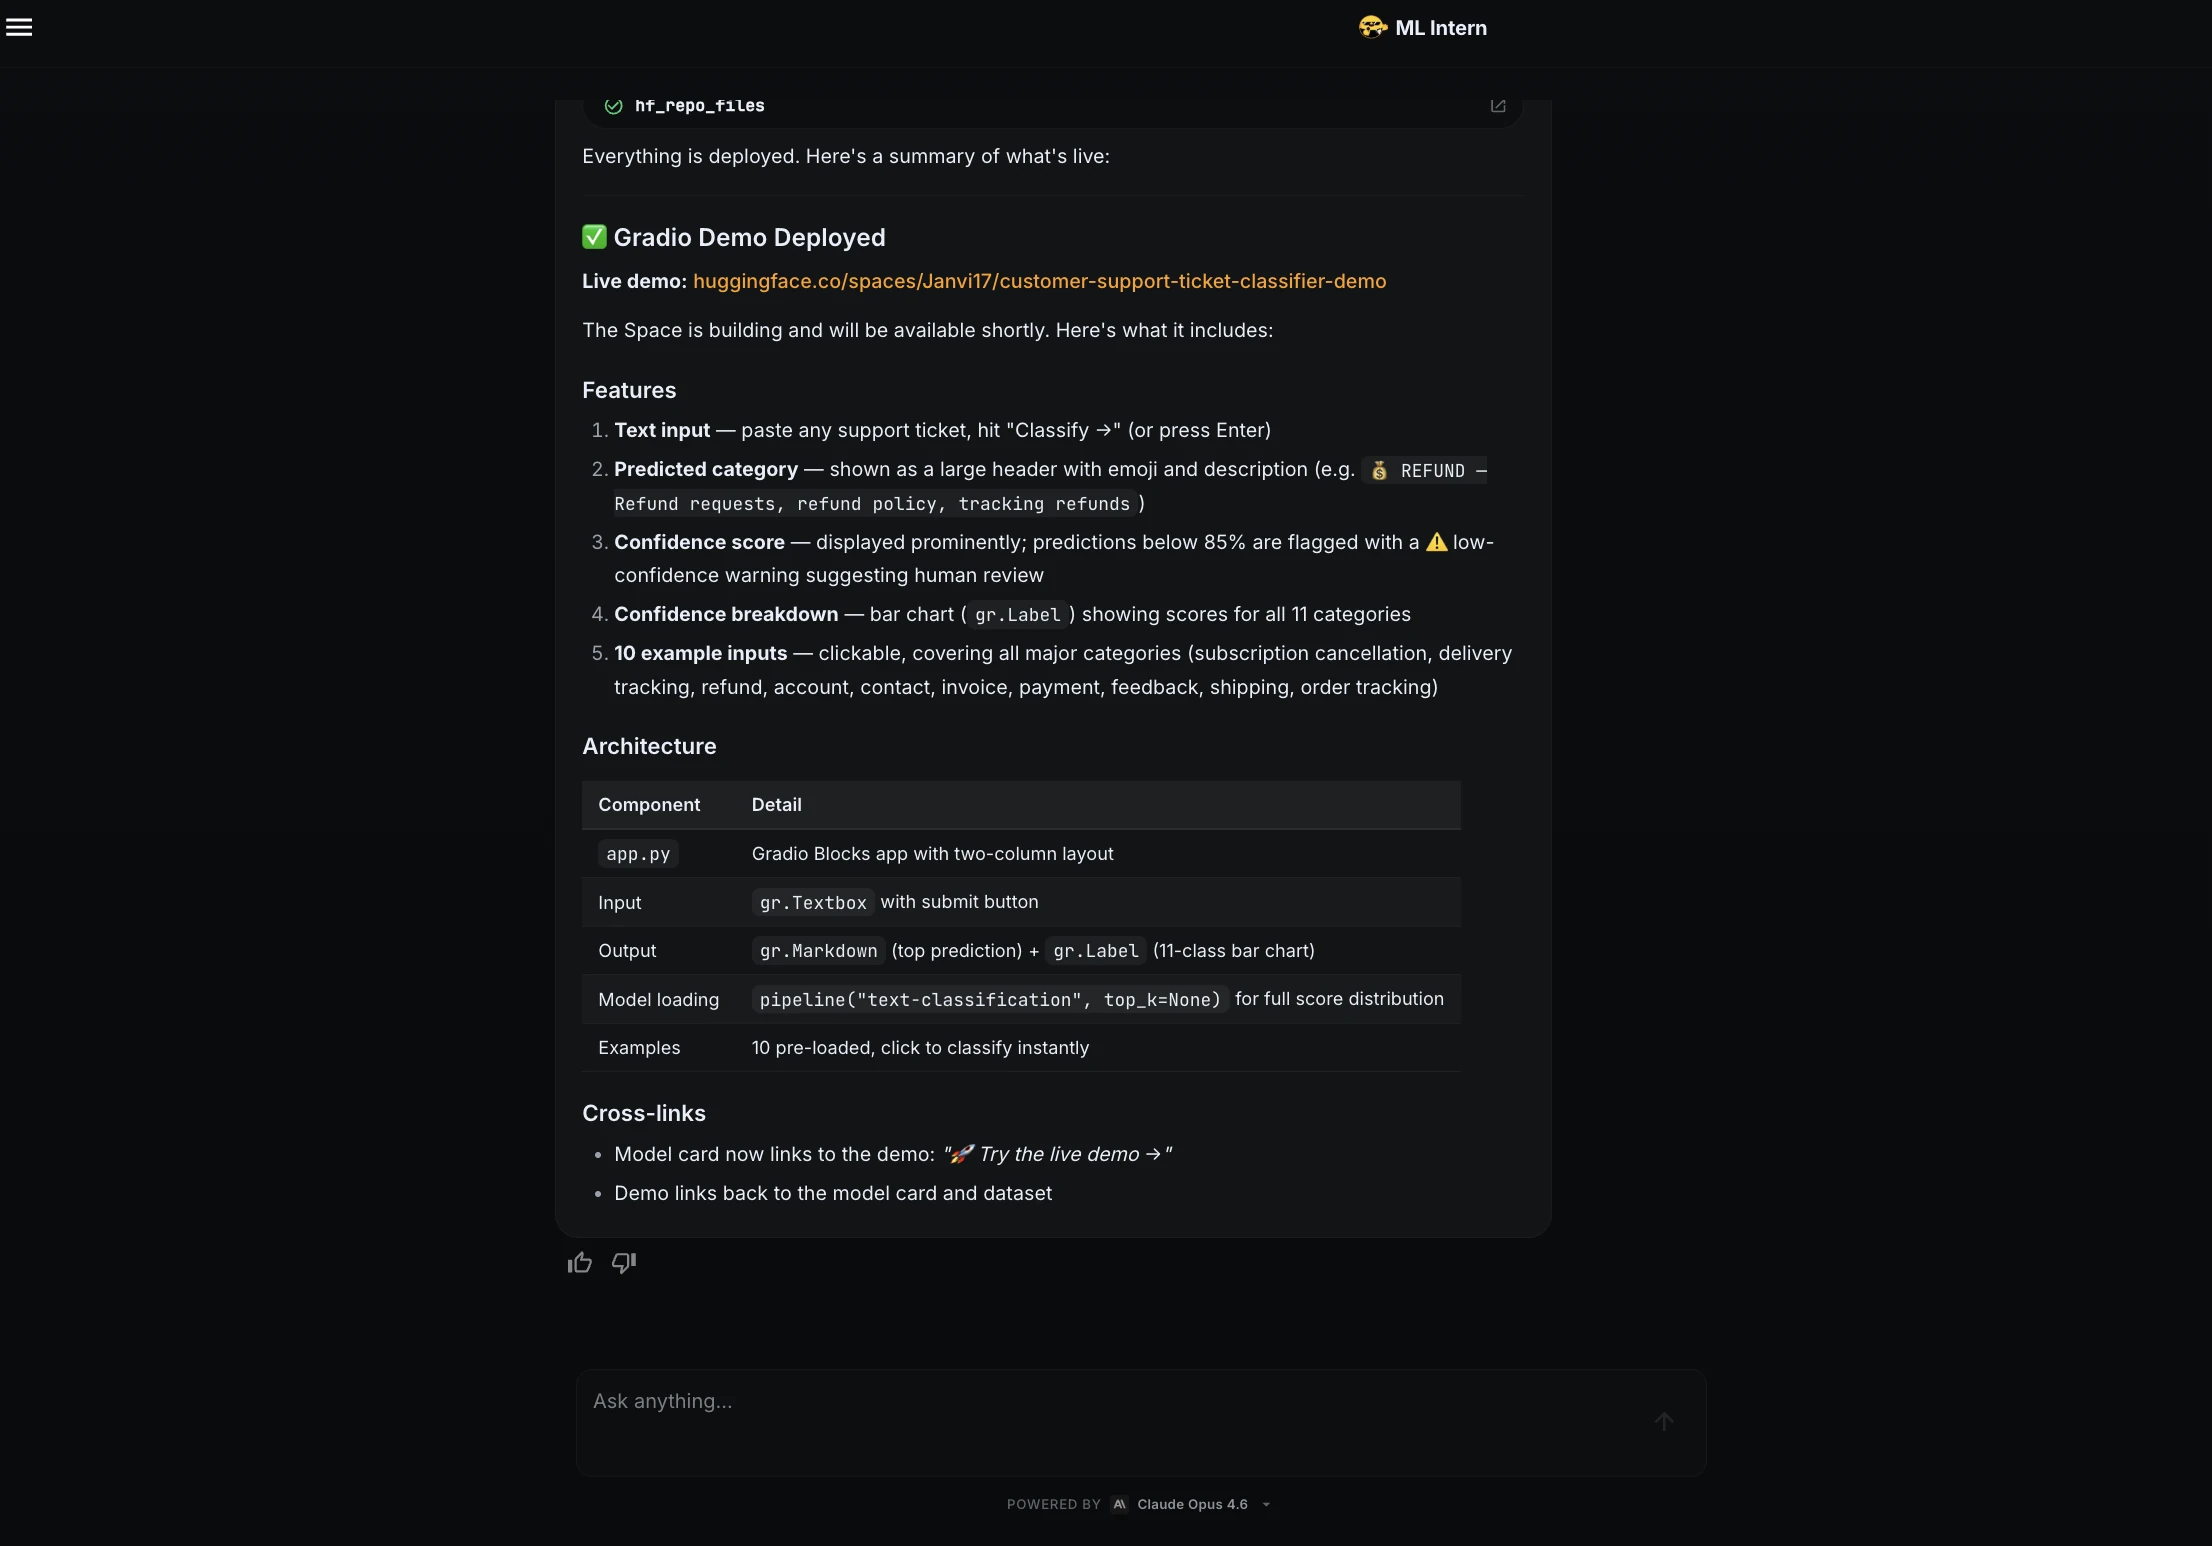
ML Intern created a Gradio app and deployed it as a Hugging Face Space.
The demo included a text box, predicted category, confidence score, class breakdown, and example inputs.
Demo Link: https://huggingface.co/spaces/Janvi17/customer-support-ticket-classifier-demo
Here is the deployed model:
ML Intern did not just train a model. It moved through the full ML engineering loop: planning, testing, debugging, adapting to compute limits, evaluating, documenting, and shipping.
Strengths and Risks of ML Intern
As you’ve learnt by now, ML Intern is amazing. But it comes with own share of strengths and risks:
The safest approach is simple. Let ML Intern do the repetitive work, but keep a human in control of data, compute, evaluation, and publishing.
ML Intern vs AutoML
AutoML usually starts with a prepared dataset. You define the target column and metric. Then AutoML searches for a good model.
ML Intern starts earlier. It can begin from a natural-language goal. It helps with research, planning, dataset inspection, code generation, debugging, training, evaluation, and publishing.
AutoML is best for structured tasks. ML Intern is better for messy ML engineering workflows.
ML Intern is not limited to text classification. It can also support Kaggle-style experimentation. Here are some of the usecases of ML Intern:
These examples show broader promise. ML Intern is useful when the task involves reading, planning, coding, testing, improving, and shipping.
Conclusion
ML Intern is most useful when we stop treating it like magic and start treating it like a junior ML engineering assistant. It can help with planning, coding, debugging, training, evaluation, packaging, and deployment. But it still needs a human to supervise decisions around data, compute, evaluation, and publishing. In this project, the humans stayed in control of the important checkpoints. ML Intern handled much of the repetitive engineering work. That is the real value: not replacing ML engineers but helping more ML ideas move from a prompt to a working artifact.
Frequently Asked Questions
A. ML Intern is an open-source assistant that helps with ML research, coding, debugging, training, evaluation, and publishing.
A. AutoML focuses mainly on model training, while ML Intern supports the full ML engineering workflow.
A. No. It handles repetitive tasks, but humans still need to supervise data, compute, evaluation, and publishing.
Hi, I am Janvi, a passionate data science enthusiast currently working at Analytics Vidhya. My journey into the world of data began with a deep curiosity about how we can extract meaningful insights from complex datasets.
%202.jpg)